
2023-11-01T09:01:00
(BPT) – With the influx of Proptech and emerging living behaviors following COVID-19, multifamily is changing. Allegion surveyed today’s renters to uncover what they value most, and a few of the findings are below.

Brandpoint Home & Garden

2023-11-01T09:01:00
(BPT) – With the influx of Proptech and emerging living behaviors following COVID-19, multifamily is changing. Allegion surveyed today’s renters to uncover what they value most, and a few of the findings are below.

2023-11-01T09:01:00
(BPT) – Maybe you’re tired of the hustle and bustle of big city life. The sky-high rent, cramped living spaces, constant traffic and crowds are getting to you. You may even be looking for an affordable place to settle down and start a family or launch that business idea you’ve been dreaming about.
Places like Knoxville, Tennessee; Santa Fe, New Mexico; and Greenville, North Carolina offer a lower cost of living, scenic surroundings, and vibrant downtowns with thriving arts and food scenes. That, understandably, makes them an appealing alternative to major metro areas.
And the numbers don’t lie. According to the 2023 Mayflower “Finding Home” study and census data, Americans are flocking to mid-size cities in record numbers — a trend that is only accelerating.
Want to learn more? Check out the top six reasons mid-size cities could be calling your name.
Lower Cost of Living
Tired of paying through the nose for basic necessities? You’re not alone — the cost of living in larger metros has skyrocketed, making homeownership seem out of reach for many. So, it’s no wonder 91% of movers cite cost of living as an important factor when choosing a new city.
With housing costs up to 50% less than in larger cities, you’ll find lower prices on everything from groceries to utilities in mid-size cities. Of course, the secret is out: According to Mayflower data, over 60% of people moved to Indianapolis and Charlotte, for example, for lower costs.
Strong Sense of Community
Mid-size cities are also characterized by having tight-knit communities. Residents report friendlier neighbors, feeling more connected to those around them and an overall warmer, welcoming vibe. Many transplants also say they like how these communities embrace newcomers, unlike the anonymity they experienced in bigger cities.
Access to Arts and Culture
Nearly half of movers cited proximity to arts and culture as an influence. Fortunately, mid-size cities — like Knoxville, Indianapolis, Fayetteville and Santa Fe — brim with museums, live music venues and craft breweries. Many boast local sports teams as well.
Outdoor Recreation and Natural Beauty
Two-thirds of survey respondents indicated weather and access to nature as top reasons for their move. Mid-size cities near natural amenities like beaches, lakes, mountains, and state and national parks are particularly popular destinations. Where outdoor recreation opportunities abound, residents enjoy hiking, biking, fishing and other readily available activities during their free time.
Thriving Job Markets
While mid-size cities may move at a slower pace, their job markets are still buzzing. It turns out, major employers are setting up shop in mid-size cities to take advantage of lower costs and taxes, too. This is creating new opportunities in industries like healthcare, finance, tech and business services, to name a few.
Remote Work
The pandemic allowed many people to work remotely, freeing them up to relocate wherever they please. As companies adopt hybrid or fully remote work models, employees no longer need to live in major cities just for their jobs. This flexibility has opened people’s eyes to the appeal of mid-size cities.
Dreaming of a move to a place where you can slow down, connect with like-minded people and enjoy life’s simple pleasures? Join the growing numbers settling in mid-size cities. The welcome mat is out, and there’s a spot waiting for you.

2023-11-01T12:01:01
(BPT) – Fire pits are more popular than ever, and for good reason. Not only do they look beautiful, but they provide real warmth, and their flickering flames entice friends and family to gather for storytelling, making s’mores and having a great time together. Fire pits are also a relatively easy DIY project, even for beginners, as long as you have the right materials.
If you’re considering adding a fire pit to enhance your yard, here are some things you’ll want to think about before you begin.
1. Determine your top reasons for building a fire pit
Knowing why you want a fire pit and how you primarily plan to use it can help you make a number of other decisions, such as where to put it, the materials to use, plus what size and shape you want it to be.
For example, are you primarily interested in its decorative value? A well-constructed, attractive fire pit adds visual interest to your outdoor space as well as increasing the value of your home. Do you mostly want to create a warm place to gather, extending the use of your yard into the evening and beyond the warm-weather months? Would you like to grill or cook food on it (beyond the obligatory s’mores, of course!), and do you see it as another way to help keep pests at bay? Fire pits can provide all these benefits, and more.
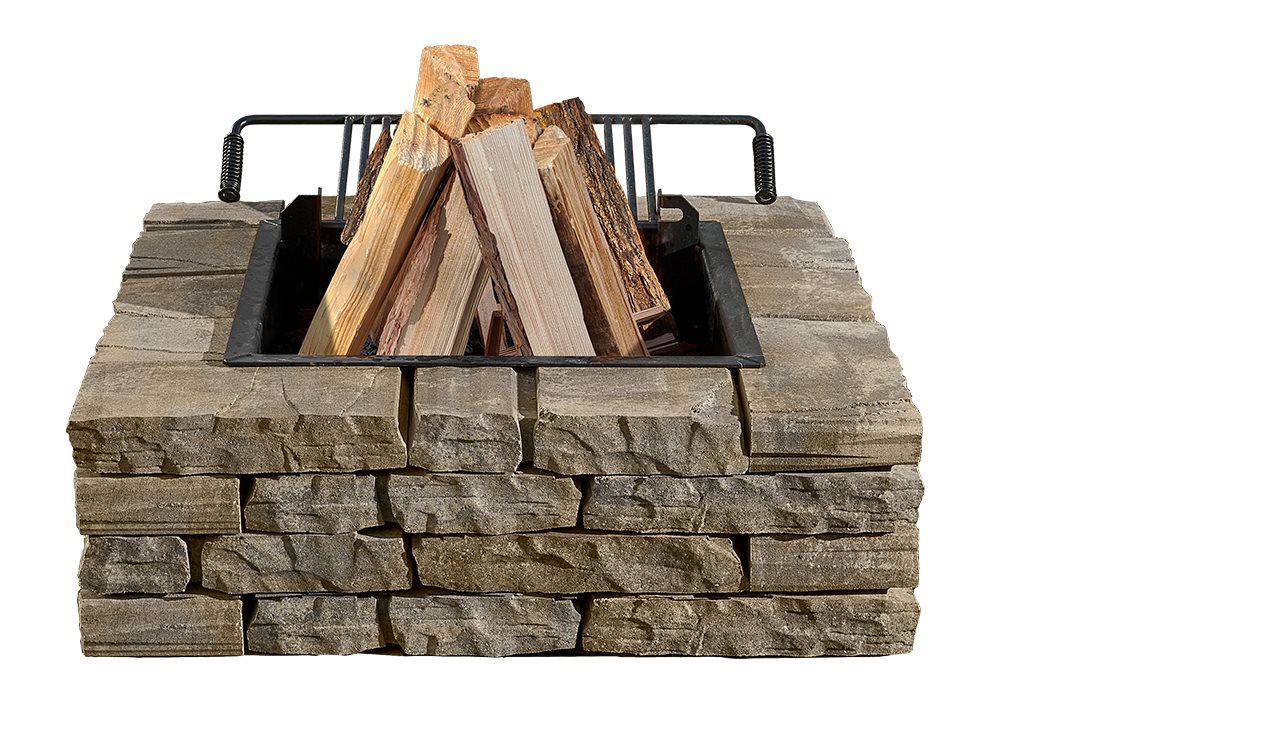
2. Choose concrete blocks to create your fire pit
Square fire pits can quickly and easily modernize a space, and they are easily created using concrete blocks. Because a square shape mimics the angular lines of your home, it helps to create the visual sense of a natural continuation of your living space, drawing the indoors out.

You can use Ladera Wall Block or the versatile Rumblestone® Wall System to create your square fire pit, and make sure to get a Pavestone fire insert to create a heat barrier between the fire and the wall blocks.
3. Where should you put it?
Placement is very important. For fire safety, first of all, it’s crucial that your fire pit is not located too close to your home or any other structures, as well as trees, shrubs or other plants. You’ll also want to check with your local municipality for rules and regulations regarding the placement of fire pits, and some areas also require that you apply for a permit.
Beyond safety considerations, you’ll want to decide whether your fire pit will be a central focal point for your outdoor space, or if it will serve as a natural boundary feature. Where you place the fire pit will also help you decide on its size and shape.
4. Don’t be afraid to DIY
While you could hire a professional to build your fire pit for you, it’s actually not that hard to construct a fire pit for less cost — and in minutes — using the right products.
For example, creating a fire pit with Ladera Wall Block is a satisfying weekend project, and can easily be installed using QUIKRETE® Construction Adhesive. No cuts, special cap or corner blocks are needed to complete your fire pit. The blocks are available in seven different face patterns, allowing varying false joints to mask any pattern repetition, so you can achieve a contemporary look that blends linear lines with subtle, natural textures. Then all you’ll need is a fire pit insert and lava rock to fill the cavity base.
5. Opt for durability
Creating a fire pit using concrete blocks has definite advantages. Your new fire pit will be strong enough to withstand the elements so you’ll be able to enjoy it for a long time. However, you will also be able to pick up and move your firepit elsewhere if your design changes, as long as it is installed on the surface.
Keeping these factors in mind, you should be able to create a beautiful fire pit that will transform your backyard into a cozy spot to gather and make memories with friends and family for years to come.
Visit Pavestone.com/retaining-walls to watch a step-by-step video showing how to construct your fire pit using Ladera Wall Block.

2023-10-28T23:01:00
(BPT) – When you walk from room to room within your home, do you see yourself within the design? For many people, the answer is no. They tend to select interior design based on trends or what other people suggest, which makes the space feel less authentic.
Your home should feel unique to you and be a place you love today and years from now. It’s important to consider your personal preferences and style so that you can create a home that is uniquely yours, and the best places to focus this energy are the kitchen and bathrooms.
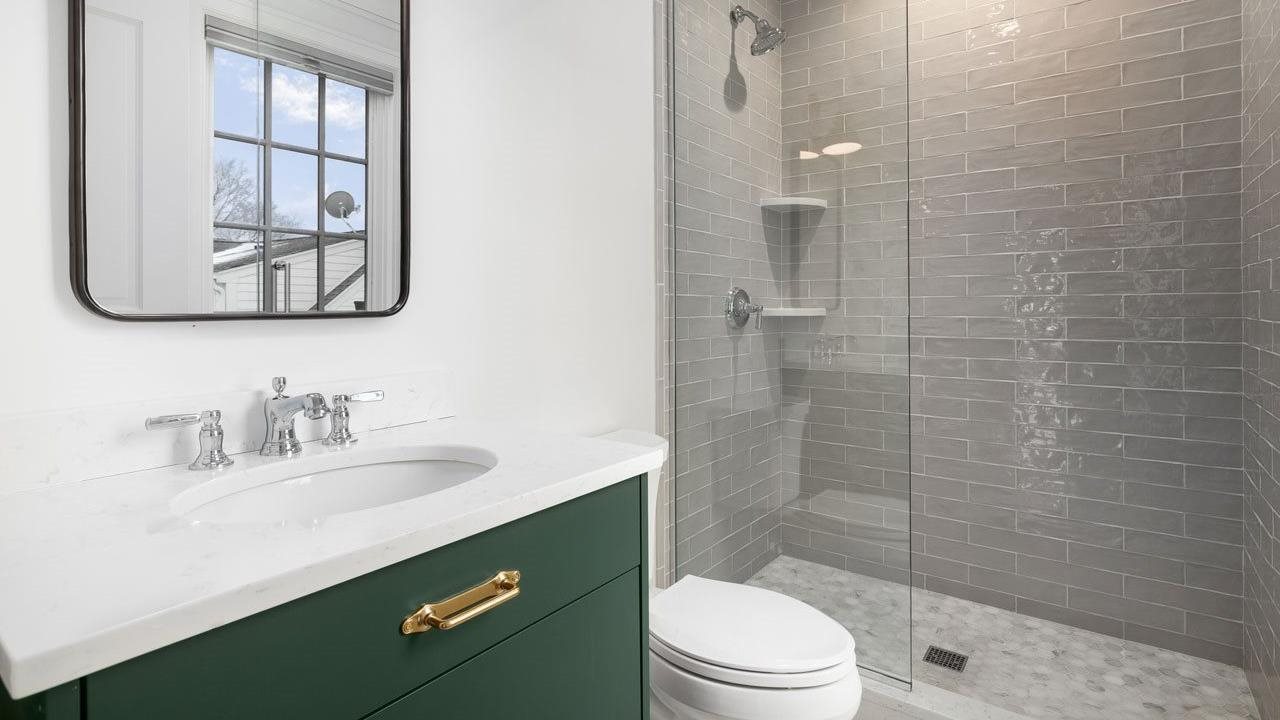
“Kitchens and bathrooms often feature white colors and clean lines, but there’s no rule that says that’s the only option,” said Alex Yacavone, Kohler Design Studio manager who specializes in color, material and finish. “It’s an exciting time for interior design because more people are getting away from basic neutrals and adding their personality in new, unexpected ways.”
She stressed that kitchens and bathrooms are the best places within the home to transform interior design with your personality in mind. Bathrooms are some of the most frequently visited spaces in the house and kitchens are the center of it all. Investing in the design of these spaces is worthwhile because it will be regularly used and enjoyed.
Ideas to get started
Yacavone suggests thinking about your goals. How do you plan to interact with the space? What would make this interaction more useful and enjoyable? What elements have you noticed and noted in magazines, stores or other homes? The answers to these questions will give you direction.
One of the best ways to add personality to a space is through elements of different color, material and finish. This allows you to tell a story in the design and make the space one of a kind. Think of different hues or textures that speak to you and how they reflect your personal style or the energy you want to evoke. Yacavone shares some examples:
Titanium: Conveys strength and style. Moodier and deeper in tone than polished nickel or chrome, it complements dark spaces as well as bright clean backdrops.
Matte black: Feels rich and modern. For instance, this striking hue becomes a defining bathroom element in the honed black color Numi 2.0 rectangle toilet.
French gold: Warm and refined, French gold is a finish that can be layered into many different aesthetics, standing the test of time in bathrooms and kitchens.
Heritage colors: Fun and eye-catching, explore pops of color found in Kohler’s heritage collection. For example, a kitchen sink in the vivid teal hue Spring Green or a clawfoot bathtub in the warm pink tone of Peachblow.
Florals: Classic and comfortable, consider featuring florals in unexpected ways including the bold floral photography sink designs in the Dutchmaster collection.
Soft neutrals: Organic and welcoming, the new color Truffle is a warm neutral that is an ideal foundational color. Reflective of Mother Nature, Truffle complements warm finishes well, including French gold.
For more ideas and inspiration about finish, color and material, visit Kohler.com.
Striking balance
When adding personality to the kitchen and bath, it’s important to find balance in design. A good way to make sure personal design doesn’t go overboard is to determine a focal point.
“Select a focal point in the room and build out from there,” suggested Yacavone. “Maybe it’s colored cabinets or a pattern on the sink. This becomes your touchstone that you can go back to if it feels like you’re losing focus or adding too many competing elements.”
Go ahead, get personal
Your home is where you should feel you belong. Adding personality to kitchen and bathroom spaces allows you to create a home that is uniquely yours. Explore how your individual style can redefine your interior design choices.
2023-10-27T14:45:00
(BPT) – Your bathroom should be a comfortable and safe sanctuary, providing a space to relax and rejuvenate. However, for homeowners with mobility challenges, the bathroom can become a potential hazard. Fortunately, several essential mobility upgrades can transform a bathroom into a safer and more accessible space.
1. Tub-to-Shower Conversions
For many homeowners, the traditional bathtub can be a significant obstacle when mobility is an issue. Stepping over the side of a tub can be challenging, making it a potential slip-and-fall hazard. That’s where a tub-to-shower conversion can help.
Tub-to-shower remodeling involves removing the tub and replacing it with a low-threshold shower. This upgrade not only makes it easier to access the shower but also provides a more open and spacious bathing area. To learn more about tub-to-shower conversions and how they can improve your bathroom’s accessibility, visit Modernize Home Services’ guide to tub-to-shower conversions.
2. Walk-In Tubs
If you need a comprehensive solution to bathroom safety and accessibility, a walk-in tub or walk-in tub/shower combo can be excellent options. These specialized tubs are designed with a door that allows you to enter and exit without stepping over a high wall, and a walk-in tub shower combo makes it possible to take a shower in the tub if preferred.
Walk-in tubs typically include built-in handrails, anti-slip flooring, and comfortable seating, ensuring a secure and relaxing bathing experience. To explore the different types of walk-in tubs and understand how they can benefit you, you can read Modernize.com’s overview of walk-in tub types.
3. Other Bathroom Accessibility Modifications
Beyond tub-to-shower conversions and walk-in tubs, other accessibility modifications can enhance the safety of your bathroom. These include:
Explore a robust list of bathroom accessibility modifications and understand how they can make your bathroom safer; review Modernize’s page on bathroom accessibility modifications.
4. How to Save on Bathroom Tub Remodeling
While a safe and accessible bathroom is a top priority, it’s also essential to stay within your budget when making improvements. Remodeling your bathroom can be a significant investment, but there are ways to save money without compromising on quality and safety.
Discover tips for saving money on a walk-in tub project with Modernize.com’s guide to saving money on a walk-in tub. This resource provides insights into cost-effective strategies for bath remodels and the potential avenues for financial assistance with home accessibility modifications.
Hire a Bathroom Remodeling Contractor
Enhancing bathroom safety is a significant step toward improving your home’s overall accessibility, and it can make an important difference in your daily life.
Take the first step toward creating a safer and more comfortable bathroom for you and your loved ones by meeting with an experienced bathroom remodeler, such as American Standard Home Services, to discuss your needs and budget.
Modernize.com can match you with a professional in your area: https://modernize.com/bathroom-remodel.

2023-10-27T07:01:00
(BPT) – If you’re concerned about your home’s air quality, especially if anyone in your household has asthma or allergies, now is the perfect time to consider cleaning up your indoor air quality. With fall allergy season in full swing and colder air on the way, the quality of the air in your home is more important than ever.
Here are tips to improve your indoor air quality.
Change air filters frequently
When filters aren’t replaced, dirt and debris buildup results in more particles remaining in the air and decreased airflow. This makes your HVAC system work harder, reducing efficiency and raising energy bills. It’s crucial to regularly replace disposable filters that can be found in furnaces, air conditioners, air handlers, humidifiers or cleaners. Be sure to clean any filters that are not disposable.
How often should you change filters? Start by checking the owner’s manual for specific recommendations. Trane Residential, a leading residential HVAC brand, recommends changing them every 30-90 days.
Need help remembering to replace air filters or getting the correct size? Get a subscription! TraneFilter powered by FilterTime is a subscription service that ensures you’ll have the right-sized filter at the right time. Consider signing up for a subscription using the Trane Home app or at TraneFilters.com. You can set up filter reminders in your Trane Home app, and you’ll receive free shipping of replacement filters directly to your door.

Eliminate sources of indoor pollutants
Common sources include gas stoves, some cleaning supplies, paints, tobacco products and wood-burning fireplaces. When contaminant levels are high, effects from exposure can show up immediately such as irritation of eyes, nose and throat, headaches, dizziness and/or fatigue.
Use controlled ventilation
When sources of indoor air pollutants can’t be eliminated, consider supplying clean, fresh air to your indoor environment. Opening windows may allow for air exchange but won’t filter the incoming air or block allergens or asthma triggers like pollen.
The best way to ensure adequate fresh air is supplied to your home is to keep windows and doors shut and use a filtered mechanical ventilator to bring fresh air in, filter it through your HVAC system and expel the stale and polluted air outside.
Add a whole-home air-cleaning device
Exceeding what standard HVAC filters can do, a whole-home air cleaning device removes harmful fine particulates, smells, allergens, mold, and viruses from the air. For example, a Trane CleanEffects® Whole Home Air Cleaner can remove up to 99.98% of unwanted airborne pollutants as small as .3 microns.
CleanEffects is certified asthma & allergy friendly® by the Asthma and Allergy Foundation of America. For the over 65 million Americans with asthma and allergies, this certification mark guides consumers in identifying products more suitable for people with asthma and allergies. The asthma & allergy friendly® Certification Mark is awarded only to products scientifically proven to reduce exposure to asthma and allergy triggers.
Make it easier to live with your four-legged friends
Air quality is even more important if you have fur babies in your home, as pet dander is a common allergen. A Trane Residential survey of 2,000 pet owners conducted by OnePoll found the average pet owner spends 832 hours each year cleaning after their pets, and 3 in 4 say they clean their homes constantly since getting their furry friend.
When it comes to allergies, 45% of pet owners said they were happy to put up with some sneezing. If this sounds familiar, using a whole-home air cleaning device can improve your comfort while enjoying your furry family members.
Balance humidity
Maintaining your home’s humidity level between 35-60% is another factor in improving indoor air quality. Mold, dust mites, and other air pollutants tend to thrive outside that humidity range. You can monitor humidity levels through a reliable HVAC thermostat and help manage it with a whole home dehumidifier and/or humidifier.
Set up an HVAC service check
It’s important to test your home’s indoor air quality to identify pervasive issues like pollen or allergen introduction that can negatively affect you or someone with asthma and/or allergies.
If you’re experiencing health symptoms that may be related to bad air or just want peace of mind, have a local Trane Comfort Specialist near you test your home’s air. They can help you find solutions to reduce air pollutants and improve your home’s overall air quality.
In honor of National Indoor Air Quality Awareness Month, learn more and act now to breathe easier at Trane.com.

2023-10-25T13:51:00
(BPT) – When it comes to your deck, the railing is not just a functional necessity but also a crucial design element that can enhance the aesthetics and safety of your outdoor space. But, with so many options and industry jargon to decipher, choosing the right deck railing system can be daunting. Fear not. This article will guide you through the world of deck railing — from spindles to solar caps — to help you make informed decisions that suit your style and practical needs.
Common railing components
Understanding the parts of a deck railing system will help you navigate the terminology associated with different options.
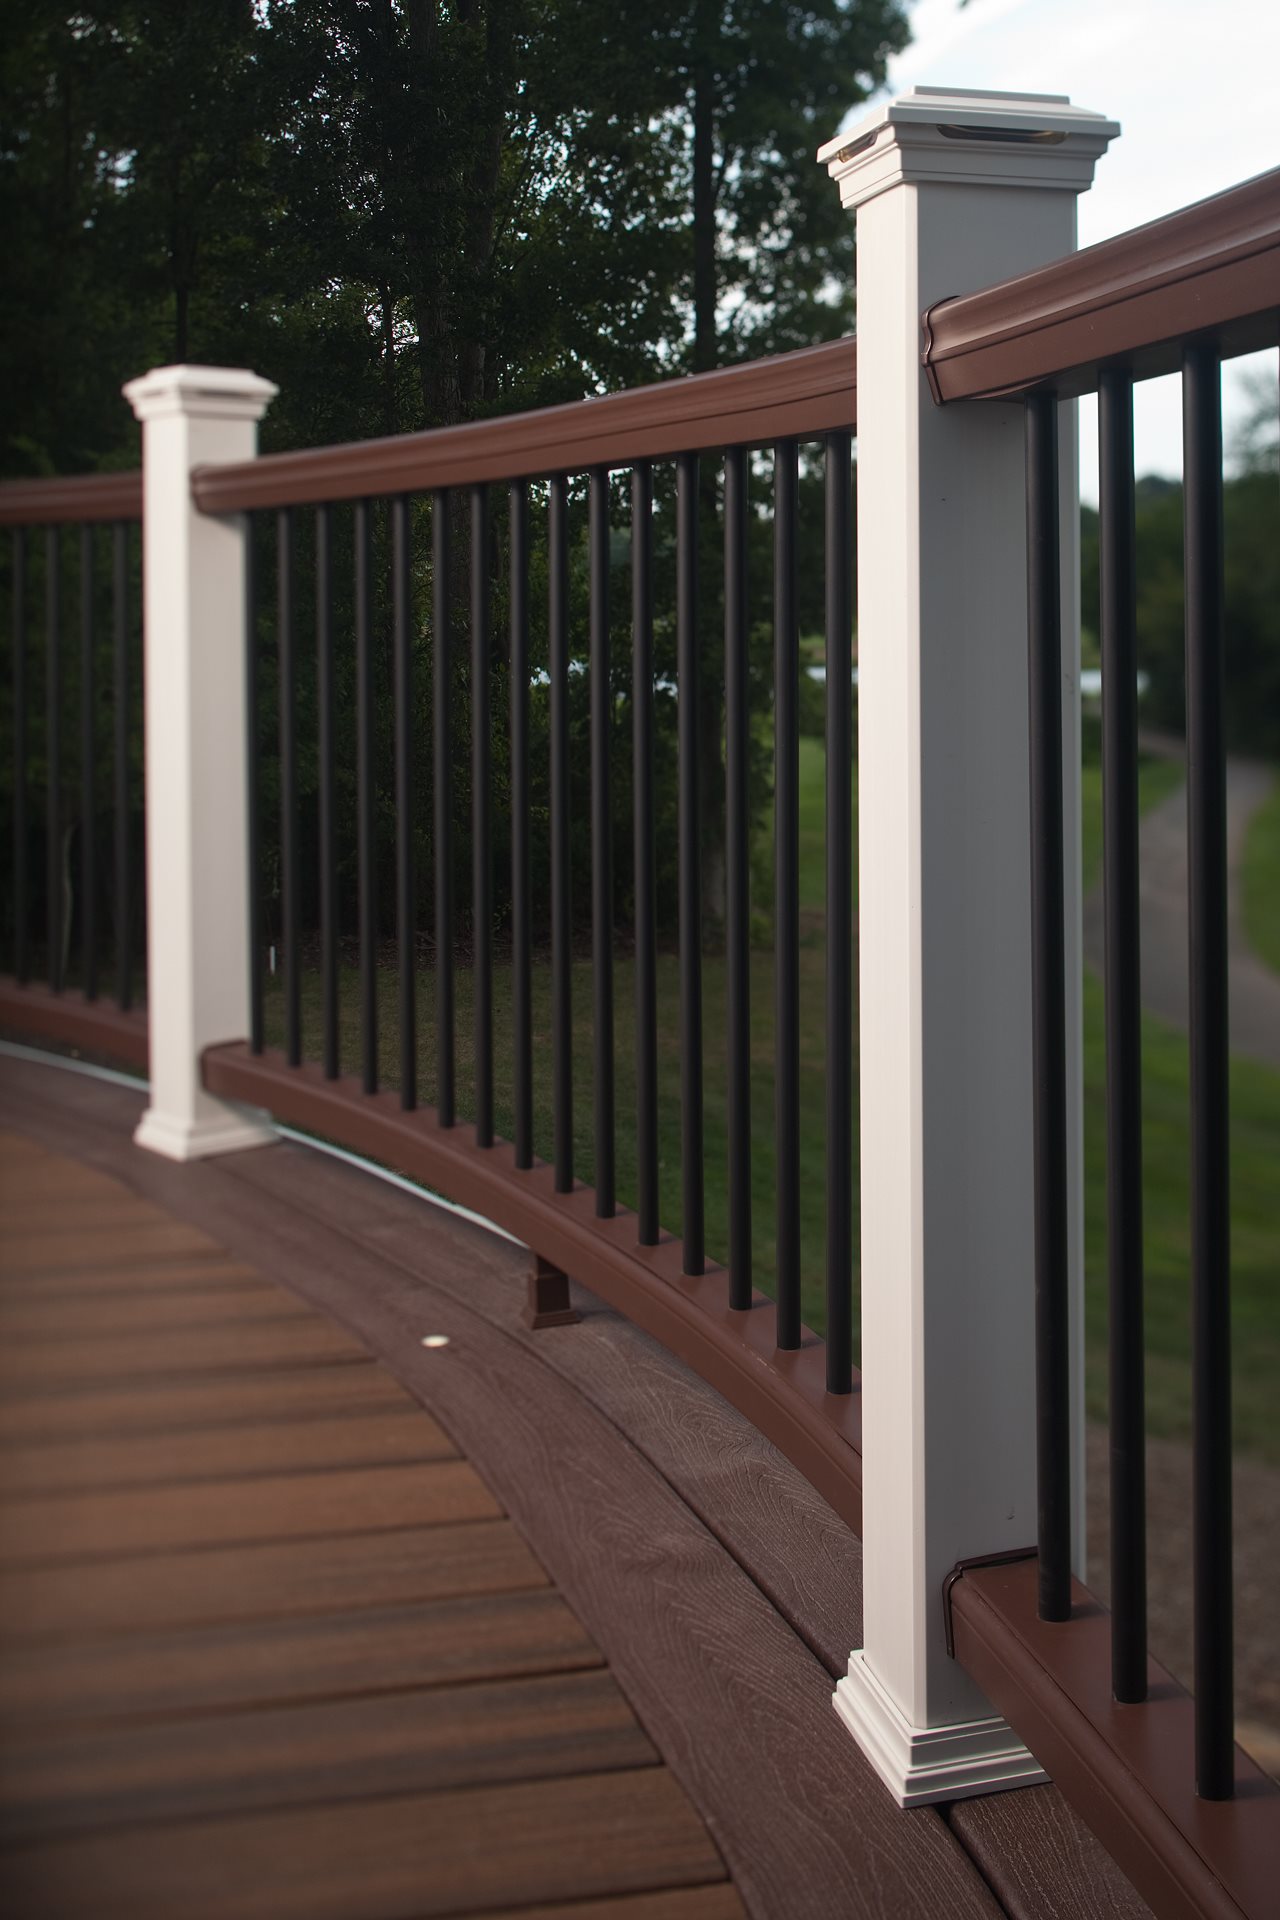
Top Rail

This horizontal component — also called the handrail — sits on top of the railing system providing stability while also making a style statement. Top rails come in a variety of styles from traditional crown top (shown here) to more contemporary, minimalist designs.
Cocktail Rail

Also known as drink rail, cocktail rail is a popular option among homeowners who like to entertain. This application uses a deck board as a top rail to create a flat surface ledge at just the right height for holding drinks and plates.
Bottom Rail

The bottom rail is the horizontal piece that runs along the bottom of the railing system to hold the balusters or infill in place.
Balusters

Often referred to as spindles, balusters are the vertical components between the top and bottom rails that provide support and prevent small objects, pets and children from slipping through.
Infill
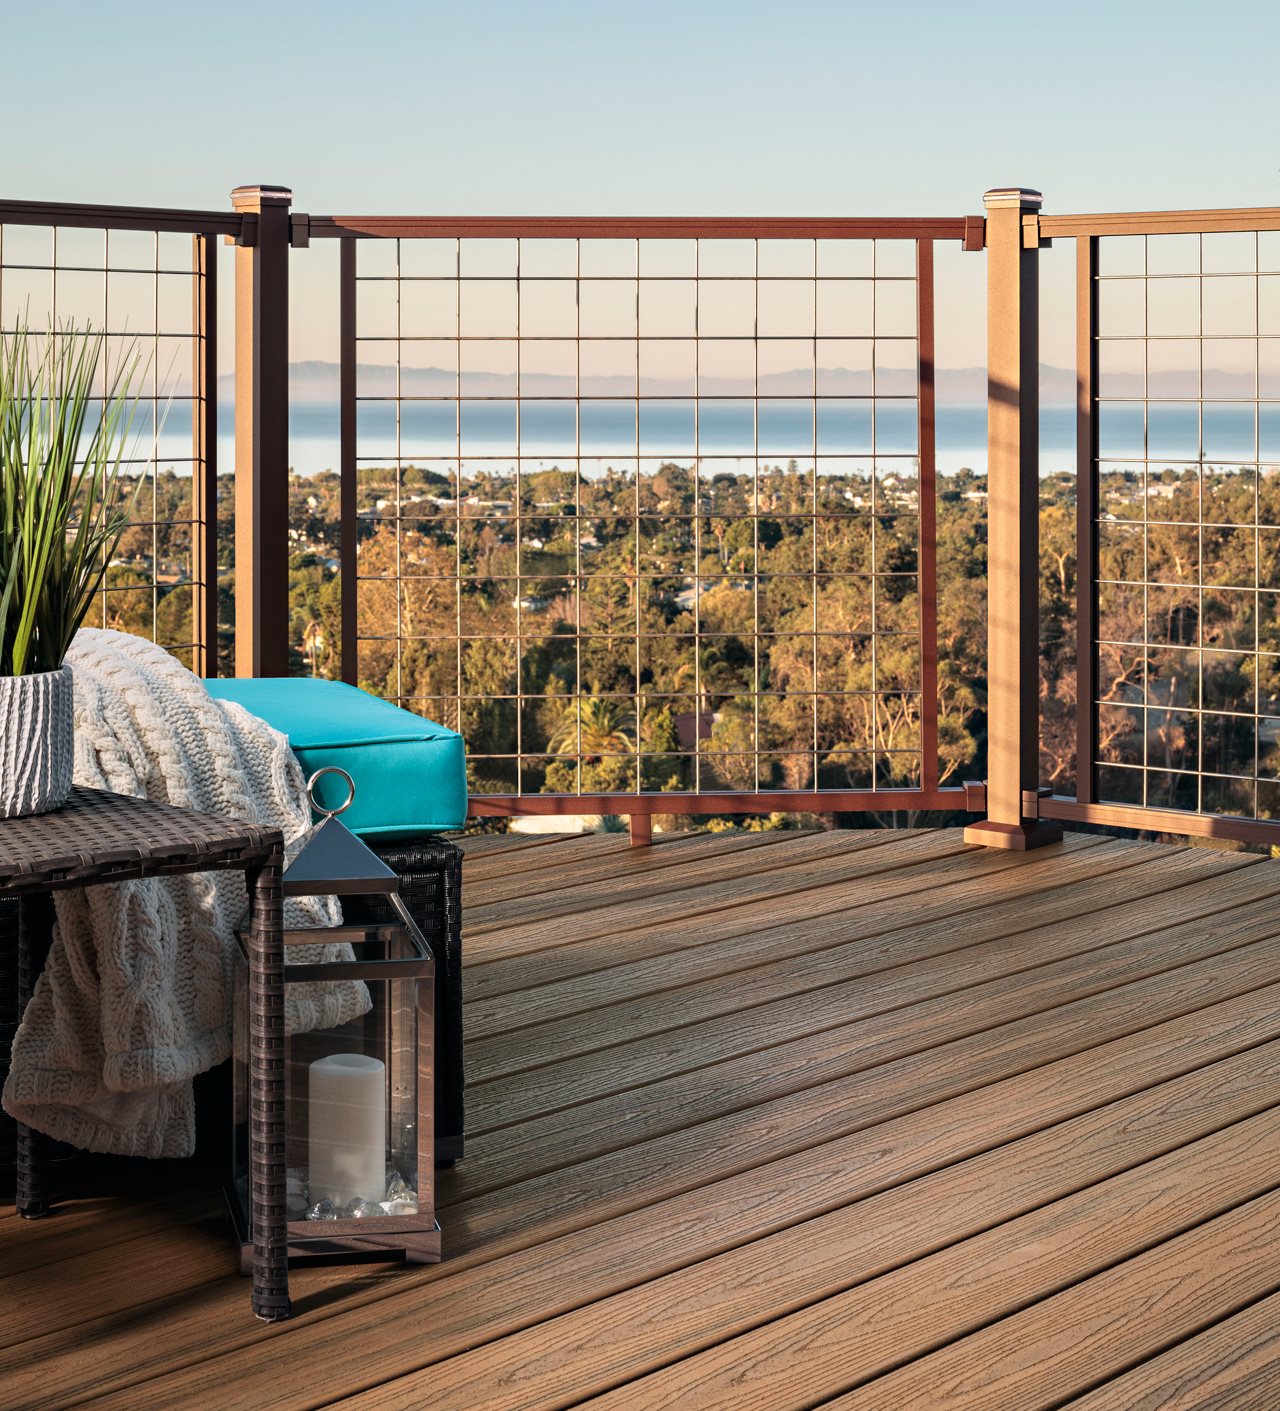
Railing infill comes in a range of styles from traditional vertical balusters to horizontal rods or cables. Glass and decorative mesh panels (shown here) are other options.
Posts
These are the larger, more substantial vertical pillars typically placed at corners and intervals along the railing to serve as anchor points for the system. They provide structural support and can be decorative elements as well. Posts can be made from wood, metal, aluminum or composite material. In some cases, they come with sleeves that slide over wooden posts to add a decorative touch.
Caps

These optional decorative pieces can be placed on top of railing posts to add a finishing touch and extra protection. Caps come in a range of shapes and styles, including LED and solar-powered options that light up to enhance ambiance and safety at night.
Railing material options
While wood remains a classic choice for deck railings, it requires regular maintenance to prevent rot, warping and fading. For a more on-trend look with less hassle, consider the following options.
Metal

Metal railings, such as aluminum and wrought iron, provide durability and a sleek, modern appearance. They require less maintenance than wood and are known for their strength. Metal railings can be customized with various finishes and designs to match your aesthetic preferences.
Composite

Composite railings combine the best of both worlds — the appearance of wood with the durability and low maintenance of plastic and metal. These railings are resistant to rot, insects and fading, making them a popular choice for busy homeowners.
Glass
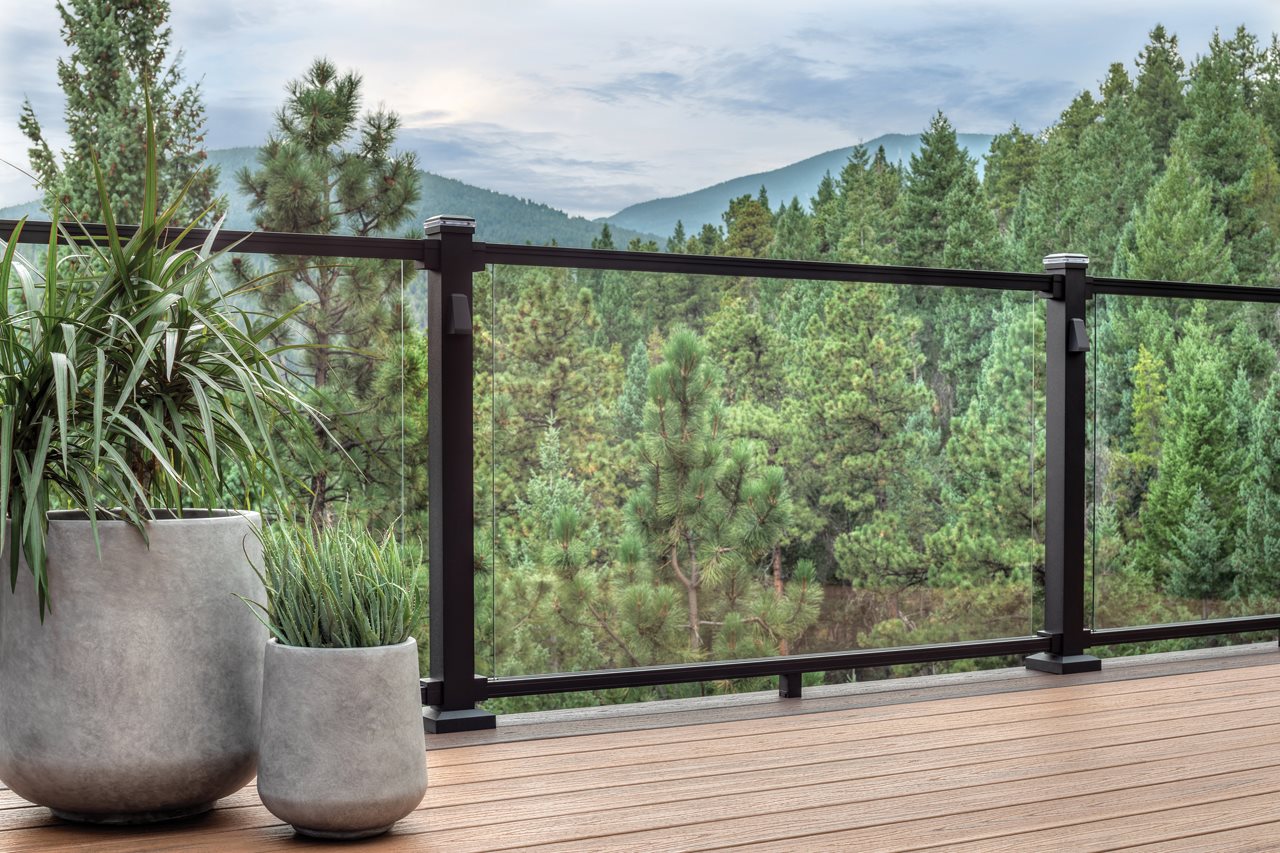
Perfect for decks with scenic views, glass railings offer safety and style. Tempered glass is commonly used for its strength.
Finding Your Perfect Pairing

Selecting railing should be fun, but it can also be overwhelming considering the wide array of available options. To simplify things, use one of the following approaches:
For perfect pairings, Trex offers a Decking & Railing Duos tool on its website, which features designer-curated decking and railing combinations.
Now that you’re familiar with the various deck railing options and common terms, you can confidently embark on your deck project. Remember that the right deck railing not only enhances safety but also adds personality and charm to your outdoor space, making it a place where you’ll love to spend time for years to come. For more information about deck railing, visit Trex.com.

2023-10-20T08:41:00
(BPT) – When it comes to giving your home a fresh, new look, few projects are as transformative as a flooring installation. Whether you’re tired of that old carpet or seeking to enhance your living spaces, the journey to a new floor can be both exciting and daunting. To ensure your floor remodeling project meets your expectations, follow these five essential steps:
1. Select the Best Flooring Type
What’s the best flooring? The perfect flooring type suits your lifestyle and aesthetic preferences. With a wide array of flooring materials available, the decision can be overwhelming. From the warmth of hardwood to the practicality of laminate, each type has its unique advantages and drawbacks.
In a recent survey by Modernize Home Services, most homeowners — 16% of total respondents — planning a flooring remodel project in the next 12 months intend to choose laminate. It’s a top choice for many due to laminate floor durability and affordability. Hardwood and tile floors were tied closely behind with 15% each.
To make an informed choice, explore Modernize’s comprehensive guide to flooring types. This resource, available at no cost, offers a clear summary of various flooring types and includes a helpful quiz to assist homeowners in making the perfect selection.
2. Research the Cost of Flooring Installation
One of the most crucial aspects of planning a flooring project is understanding the cost involved. The expenses can vary based on factors like your location and the specific flooring materials you choose. So, it’s essential to research local flooring installation costs to set a realistic budget for your project.
To gain a better understanding of the cost of flooring installation, read Modernize’s guide to flooring costs.
3. Identify Skilled Contractors for Flooring
Selecting the right contractor for your flooring project is as vital as choosing the flooring material. A skilled and experienced professional can make a big difference in the quality of the installation. Look for contractors who specialize in flooring projects and have a solid track record of successful installations.
Ask family and friends for recommendations and use an online contractor matching service, such as Modernize.com, to connect with experienced professionals in your area. Review floor remodeling professionals’ business profiles, such as this overview of Empire Today, to understand a flooring contractor’s experience and expertise before requesting a quote for your project.
4. Order Flooring Materials
Once you’ve chosen the best flooring type and identified a reliable contractor, it’s time to order the necessary materials. Depending on the flooring type you’ve selected, the required materials can vary. Work closely with your floor remodeling contractor to ensure all materials are ordered before your planned installation so that your project stays on schedule and is completed in a timely manner.
5. Prepare the Space for Installation
As you prepare for a new flooring installation, get your space ready. This involves clearing the area of any obstructions that might hinder the process.
While contractors typically handle moving large furniture, it’s the homeowner’s responsibility to pick up toys, shoes and small items from the floors. Additionally, items like standing lamps, decor and other smaller items should be moved to allow for a seamless installation process.
Flooring Renovation Return on Investment (ROI)
All flooring projects can potentially increase your home’s value, particularly when installing hardwood, tile or good-quality carpet. Modernize explains how to approach calculating the return on your flooring project and advises homeowners to maximize flooring renovation ROI by upgrading strategically, choosing materials that best balance aesthetics and value, and selecting neutral flooring colors that complement any decor style.
Enhancing the beauty and value of your home has never been more accessible. Learn more about how new floors can be a valuable investment on Modernize.com: Calculating the Return on your Flooring Project.
2023-10-17T19:01:00
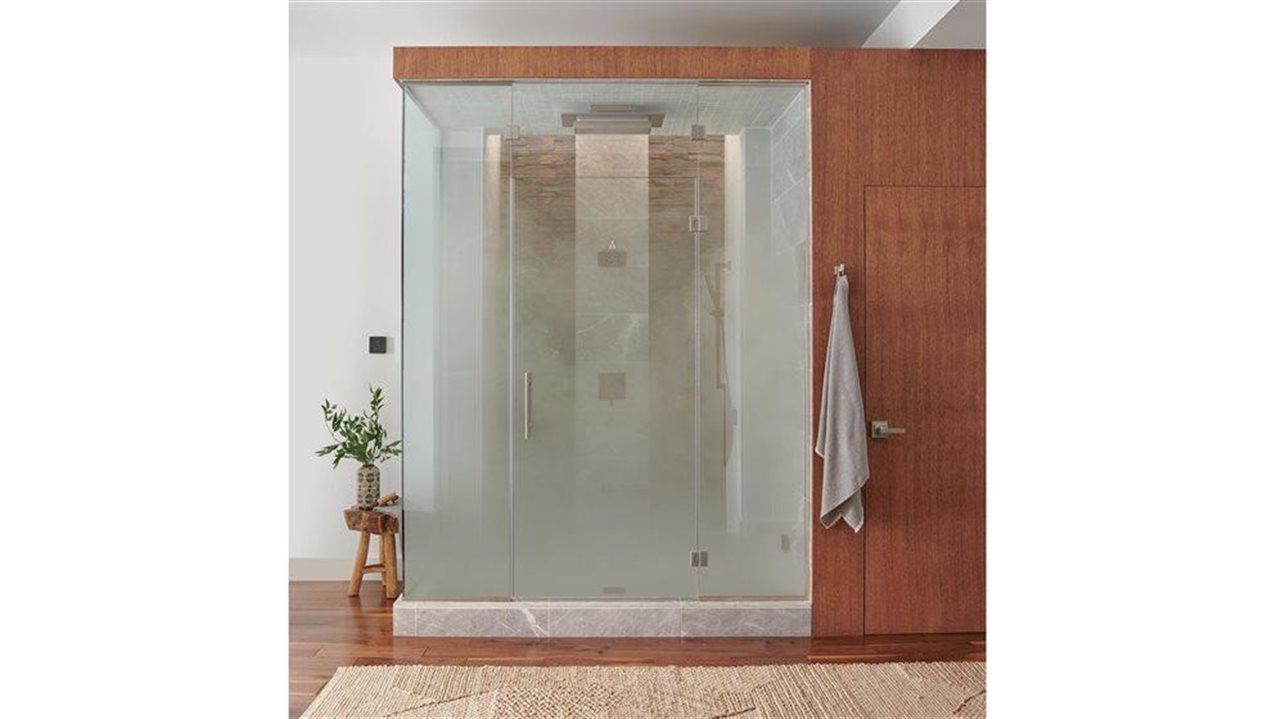
(BPT) – From waking up and setting the right tone for the day ahead, to winding down with a nighttime routine, a bath space has the potential to evoke feelings of deep relaxation. It’s a space that can be designed to generate a sense of tranquility and enhance well-being for the mind, body and soul. Starting and ending the day with self-care as a priority is the ultimate form of wellness.
Wellness for the senses
A great way to promote wellness is by engaging the senses in an immersive, vitalizing experience. Imagine a shower that soothes both the body and the mind, all while fostering a calming space. With the Brizo® Mystix™ Steam System, one can choose the lavish simplicity of the Elemental Experience or the holistic ambiance of the Transcendent Experience. Both are finely curated shower experiences that bring a sense of serenity to the bath. The Elemental Experience transforms the space into a restorative spa with its innovative Mystix™ Steam Generator. The Transcendent Experience combines all the benefits of the Elemental Experience with enhanced technology, plus a full suite of spa options: aromatherapy, chromatherapy and audiotherapy. These features rejuvenate the senses and elevate the shower to an entirely new level of indulgence, transforming the daily practice of showering into a self-care experience that one truly looks forward to as part of the day.
Personalizing the shower experience
Luxury is not one-size-fits-all; it’s found in the distinctive details. A personalized selection of products and features can elevate a shower from simple to grand. Whether selecting an essential oil to be dispersed with the steam, choosing a light color that soothes the mind, listening to a personal playlist through a connected app during a steam shower session — or all three — one can tailor the experience to fit the desires of the user. The variety of options and ability to customize these details ensures the shower fulfills these distinct wellness needs. The Mystix™ Steam System Transcendent Experience allows users to choose from seven different mood-enhancing lights, with each color creating a unique ambiance, and select from an array of five finely curated fragrances to transport the senses through the benefits of essential oils. Both inspiring and calming, these sensory elements work together to rejuvenate the mind and the body, undoing the stresses of the day. The resulting sense of harmony is one only a well-crafted steam shower can bring.

2023-10-17T11:01:00
(BPT) – Have you ever wished you could do more to harness the solar energy captured by your home’s solar panels? Have you ever wished your generator was quieter and didn’t smell so bad? Have you ever grappled with EV range anxiety or wanted additional backup power in your RV? If so, then this news is for you. Cast off the anxieties and annoyances! A better way is here.
Anker’s SOLIX F3800 Portable Power Station is the flexible, cost-effective and easy-to-install power system breakthrough in whole home (and EV) backup power the world has been waiting for. Tens of thousands of solar enthusiasts have already signed up to be the first in line for this power station. And with these three game-changing innovations in the mix, odds are the excitement is just going to keep on climbing.
1. Powerful output + AC coupling
This is the first power station to feature AC coupling, and it offers 6000W of AC power output to power most home appliances. It also provides 120V/240V dual voltage output, letting you run both standard and high-energy devices simultaneously.
Worried that 6000W might not cut it? Perhaps you’ve got a large home to power, or some seriously demanding equipment to run? No worries. This power station can be doubled up for a staggering total output of 12000W.
2. Extended backup power
In the past, limited battery storage has left a lot of otherwise interested folks wary of making the switch to solar. Now, you can put those fears to bed. A massive 3.84kWh internal battery provides ample backup power at the drop of a hat. Plus, by combining two power stations and up to 12 additional batteries, the average homeowner can get up to a week of backup power. That’s enough to see you through the longest recorded blizzard in U.S. history plus three days to spare!
3. Take it where you need it
However, not all power needs are stationary. And when you have big electricity demands on the go, you want a power station that can go with you. With a convenient suitcase design featuring a stowable handle and a set of large, sturdy wheels, the F3800 is always up for the trip.
EV owners, take note. Fear of losing power has prevented drivers from maximizing their road trips for far too long. Set yourself free with a power station that’s transportable, high-powered and easy to use. Just directly connect your vehicle’s charging cable — no additional grounding accessories required!
For RV owners out there, the F3800 can run all your appliances in the RV and power them for several days to ensure the enjoyment of your whole trip thanks to its built-in RV port.
Of course, if you’re looking for an even more portable, lightweight and super-fast power station, there’s no need to wait for the Anker F3800 to drop. Anker SOLIX C1000 portable power station was designed for small places, and is the perfect power accessory for winter emergency use or just to ensure your devices never run out of power during your festive celebrations. It is lightweight and has a fast-charging technology, compact design, plenty of ports to connect up to 11 devices at the same time, high voltage output (120 volts) and even smart app control to set power schedules.
Get an advantage with advanced solar solutions
The solar age is finally here, and those who take advantage of it have a lot to gain. No more lining up for gas to refill your generator after severe weather. No more EV range anxiety or complicated route planning. And of course, you can celebrate that big reduction in your carbon footprint thanks to a clean solar energy loop.
If that sounds like a good deal to you, head over to Anker.com/anker-solix to pre-order the F3800 today on Kickstarter.