Are you guilty of ‘wishcycling’?

2023-04-17T17:05:00

(BPT) – ‘Wishcycling’ is a buzzword for the act of putting items into a recycling bin and hoping they will be recycled. We’ve all done it. And while our intentions may be good, more often than not, we have no idea where our materials end up or whether our efforts are even worth it. But with a better understanding of how to properly recycle different types of items, we can all do our part to combat the mounting stress on our landfills and planet. Following are a few tips and tricks for making your recycling wishes come true.

Separate stretchy films from other plastics

You might be thinking plastic is plastic but, when it comes to recycling, there are actually six categories of plastics. To distinguish between these different types of plastic, look for the number within the recycling symbol on the product or packaging.

  • #1: PET or PETE is the most common plastic for single-use bottled beverages, mouthwash bottles, salad dressing and peanut butter containers.
  • #2: HDPE (high density polyethylene) is used in many packing items, including milk jugs, juice bottles, some trash and shopping bags and cereal box liners.
  • #3: PVC or V plastic can be found in blister packaging, wire jacketing, siding, windows and piping.
  • #4: LDPE (low density polyethylene) is a flexible plastic found in items like bread bags, packaging for frozen foods, newspaper sleeves, dry cleaning bags and grocery/retail shopping bags.
  • #5: PP plastic is found in yogurt containers, syrup and medicine bottles, caps and straws.
  • #6: PS includes items like disposable plates and cups, meat trays, egg cartons, carry-out containers and aspirin bottles.

Generally, the higher the number, the less recyclable the material is. Most recycling centers will accept #1 plastics without a problem, but other rigid plastics (#3, #5 and #7) can be tricky. Double-check what’s acceptable in your local area before contaminating collection bins.

Plastics marked as #2 or #4 are considered flexible plastics or films and must be handled differently from other types of plastic. Due to their stretchy nature, they cannot be recycled through standard curbside or single-stream recycling programs because they can jam machinery during the sorting process, causing mechanical issues, delays and contamination. These plastics need to be separated from other recyclables and processed through recycling programs dedicated specifically to HDPE and LDPE materials.

Know where your recyclables go

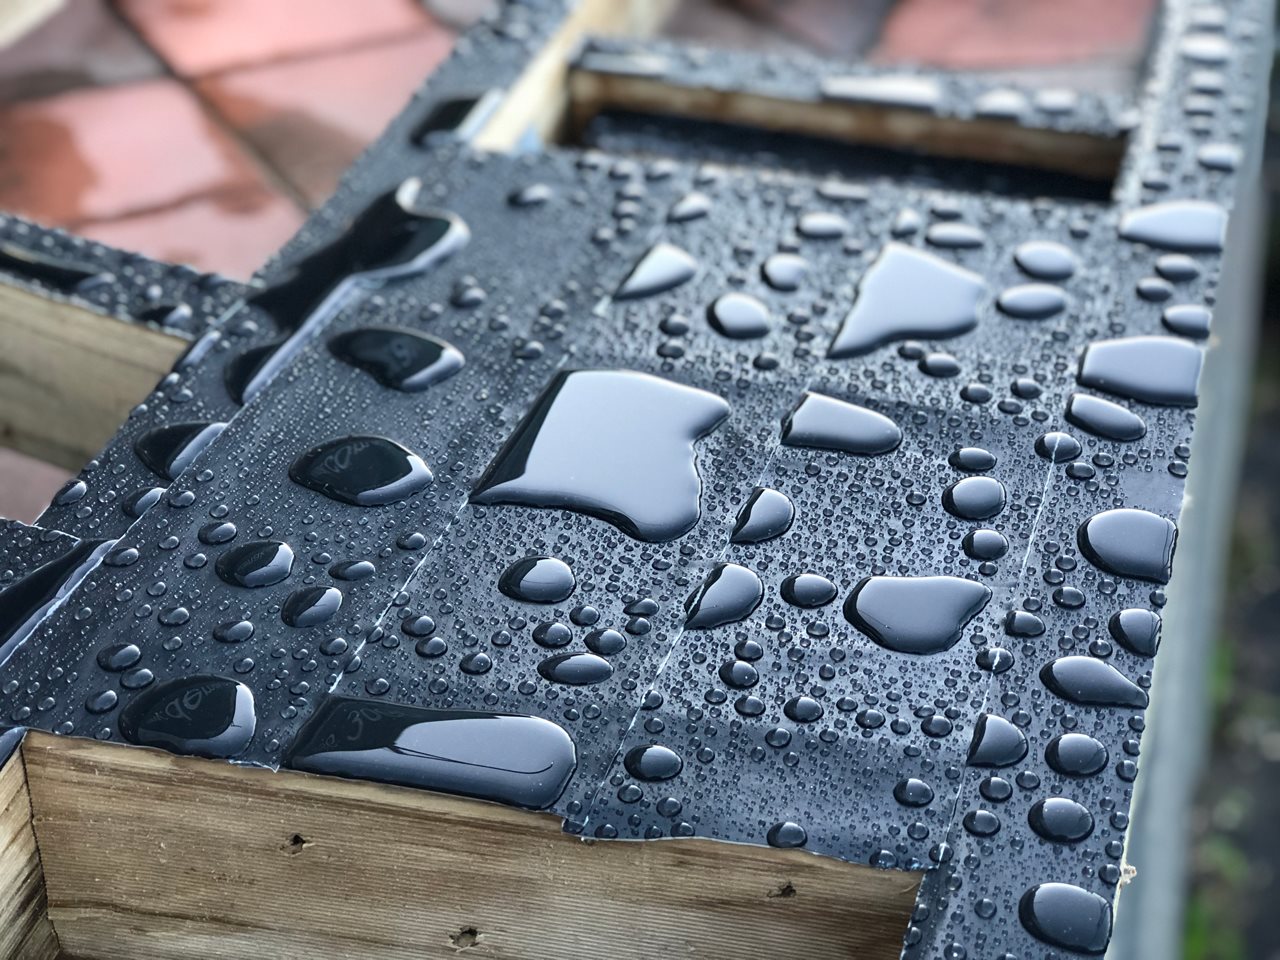
The best way to stop wishcycling is to focus on upcycling. This means knowing exactly where your recyclables are going and how they will be used. For instance, Trex® composite decking is sustainably made from 95% reclaimed materials, including a mix of industrial wood scrap and recycled polyethylene plastic film, nearly all of which comes from post-consumer sources. Through its nationwide NexTrex® recycling program, the company partners with more than 32,000 grocery store chains and major retailers along with thousands of schools and community groups to make it easy and convenient for eco-minded consumers to responsibly dispose of #2 and #4 flexible plastics and give them new life as beautiful, durable and eco-friendly composite decking. One of the largest recyclers of plastic film in North America, Trex has saved more than 5 billion pounds of HDPE and LDPE plastics from winding up in landfills over the past 30 years. A complete list of items that can be recycled by Trex along with a list of plastic film drop-off locations by state is available on the company’s website.

Make recycling part of your routine

Recycling doesn’t have to be a chore. It can easily be done as part of your daily routine. Most grocery stores have collection bins conveniently positioned at the front of the store. Many schools, churches and community centers also participate in recycling programs and serve as drop-off points for local residents. Check your municipality’s website to learn more about the programs your community has in place for recycling, or visit NexTrex.com to find a plastic film drop-off location near you.

Excited about warmer weather? Be ready to open your pool with these tips

2023-04-14T05:01:00

(BPT) – When spring arrives, it’s time to start thinking about summer fun. If you have a swimming pool, and you closed it for the winter, it’s important to plan ahead so you’re ready to open it back up for the season. Do you have all the supplies you need? Do you know what to do to get the water in top condition? When temperatures are consistently above 65ºF and there’s no longer a risk of freezing weather, you can consider opening your pool.

Here’s how to open your pool correctly, with tips from In The Swim to help you every step of the way.

1. Remove your pool cover

A cover that’s bogged down with water and debris will be difficult to remove. Use a submersible cover pump to remove as much water as possible from the top of your solid cover. Then use a pool brush or leaf net to remove leaves and large debris. This will help keep the pool a little cleaner as you peel back the cover. After uncovering your pool, clean and dry your pool cover so you can store it for use next fall.

2. Prep your pool equipment

First, you’ll have to reconnect the pump and filter if you disconnected them at closing time. Then you can reattach any other equipment to your pool plumbing, such as a tablet feeder or saltwater chlorine generator. Don’t forget to reinstall all the drain plugs in your equipment.

3. Remove winterizing plugs and accessories from the skimmer and return lines

Now it’s time to take out any remaining winterizing accessories, like pool plugs or a skimmer guard. Remember to reinstall any return fittings you removed at closing time. If you used pool antifreeze for the suction lines when you closed the pool, be sure to discharge it to waste/backwash once you start up the pump, or use a wet-dry vacuum to remove it from the plumbing.

4. Add water to the pool

A normal operating level for pool water is usually about halfway up the mouth of the skimmer.

5. Run the pump

Prime the filter pump, then set it to run continuously until the pool opening process is complete. This helps circulate the water, filter out debris and distribute your pool chemicals. Doing this ensures that your pool is well on its way to being safe for swimming once again.

6. Manually clean the pool

To get your pool clean and sparkling before you take the plunge, skim, brush and vacuum the entire pool. This will also help your chlorine work most efficiently. Enlist your whole family to help with the cleanup!

7. Treat the water

Rather than gathering a bunch of pool opening products individually, investing in an In The Swim Pool Start-Up Kit can help the process go a lot more smoothly. Start-Up Kits include a stain and scale preventative, pool shock, algaecide, clarifier, test strips and an oil-absorbing sponge to help keep your pool clean.

  • Add your stain prevention product first, then wait at least 4 hours.
  • Test the water and balance total alkalinity (80–120 ppm) and pH (7.4–7.6).
  • Add your pool shock to get free chlorine levels up to at least 1–4 ppm.
  • The next day, add the correct dose of algaecide, and wait for at least 2–4 more hours.
  • Using clarifier will help your filter clear up the water faster. Let the pump run for at least 4 more hours after application.
  • If needed, vacuum the pool again.

Check the filter pressure often throughout the process, and clean or backwash the filter as needed during startup. Let your filter pump continue to run until the water is clear.

8. Set up your regular pool maintenance routine

Test the water as you normally would, and balance any aspects that are out of range. It’s important to make any final water balance adjustments before swimmers get to jump in and enjoy the pool.

9. BONUS: Swim sooner with warmer water

Whether or not you have a heater or heat pump, solar pool covers are great for keeping heat in the pool. They greatly reduce heat loss to evaporation, and can even increase water temps up to 15ºF on their own, depending on the thickness of the cover.

In The Swim has all the supplies you need for opening and maintaining your pool, including algaecide, chlorine shock, water balancers and more. Once your pool is up and running, don’t forget to pick out a few cool, new pool floats and backyard games to maximize your outdoor fun this season. For more tips on the right way to get your pool ready for a summer full of swimming, check out the In The Swim Blog.

Planning the perfect above-ground pool deck

2023-04-13T08:05:00

(BPT) – You’ve finally decided to take the plunge and break ground on a new above-ground pool. Congratulations! Chances are, you’ll want to surround your latest backyard addition with a beautiful new deck. However, the process of designing and building a deck for an above-ground pool is quite different than a traditional deck that attaches to your home. So, before you cannonball into the deep end, consider the following tips from the experts at Decks.com:

1) Go Pro or DIY?

Your first decision is whether you want to build the pool deck yourself or hire a contractor. Consider your skill level, the amount of time you have available, and your budget. No matter which route you choose, there are plenty of helpful resources online, such as the Decks.com DIY Deck Building Guide.

Photo courtesy Trex

2) Crack the Codes

Be sure to review local building codes related to decks around pools. Slip resistance, gaps between deck boards, gapping between the deck and pool, and the slope of the deck may be regulated. Installing a self-closing gate with a lock on your pool deck may also be required to prevent access by unsupervised children.

Photo courtesy Trex

3) Pool First, Then Deck

First things first. It’s essential to install your pool before building the deck. While above-ground pools have standard wall heights, every pool will be slightly different. Don’t take a chance on building a deck that may not align with the new centerpiece of your backyard.

Photo courtesy Decks.com

4) Self-sufficient Support

Decks constructed around above-ground pools should not be attached to the pool. The structure should be freestanding and sufficiently stable on its own. Ideally, the deck should be built directly under the lip of the pool edge and laterally braced from the joists to the bottom of the posts. Check with your local municipality for approved lateral bracing.

Photo courtesy Decks.com

5) Protect Your Investment

Decks built around pools are especially susceptible to moisture, which contributes to mold growth and rotting. If you plan to build with wood, it is a good practice to install waterproofing tape, such as Trex® Protect™, over joists and beams to protect the decking substructure from standing water.

Photo courtesy Trex® Protect™

6) Factor in Fencing

Most jurisdictions mandate that any yard with a pool must also have a fence as a safety precaution. If you don’t already have a fence, be sure to earmark part of your budget to cover the construction or installation of one, and make sure your fence complies with local building codes.

Photo courtesy Decks.com

Having a gorgeous deck to accompany your new pool will elevate the look and functionality of your outdoor space while giving you plenty of room to make the most of your aquatic amenity. For more ideas, inspiration, and access to free pool deck plans, visit Decks.com.

Ready to open your pool soon? Here are the steps you need to take

2023-04-10T18:03:00

(BPT) – When the days get longer and the weather starts warming up, it’s time to start thinking about opening your pool again. Once the temperatures where you live are consistently above 65–70º Fahrenheit and there’s no longer any risk of freezing temperatures, you can consider opening the pool and getting ready for swim season.

Many people open their pools on National Pool Opening Day, which falls on the last Saturday in April. Leslie’s, the nation’s leading supplier of pool and spa supplies, started the holiday eight years ago to help pool owners get their water ready in time for summer festivities.

The experts from Leslie’s recommend the following steps to help you open your pool the right way. A proper pool opening ensures your water will be clean, safe, and beautiful this season!

1. Remove the pool cover

If you have a solid cover, first remove water from the top with a submersible cover pump. Try to remove as much debris as possible to keep it from falling into the pool and making the water dirtier. Then clean and dry the cover to prepare it for storage.

2. Reconnect your pool equipment

Next, get your equipment ready to run. Reconnect any equipment (if needed), and reinstall the drain plugs.

3. Remove the winterizing plugs

Take out the skimmer guard and return line winterizing plugs, and reinstall any return fittings you removed when closing the pool. If you used pool antifreeze to winterize the suction lines, discharge it to waste/backwash or use a wet-dry vac to remove it from the plumbing.

4. Refill the pool

Keep filling water till the pool is up to its normal operating level. This is often about halfway up the skimmer.

5. Prime the pump and get it running

Once the filter pump is primed, set it to run continuously until you’re done opening the pool. Not only will this help circulate and filter the water, but it will also help distribute your chemicals throughout the pool.

6. Thoroughly clean the pool

To make sure your pool looks beautiful and is also healthy and safe for swimming, thoroughly skim, brush, and vacuum all pool surfaces.

7. Balance the water and ensure cleanliness

Investing in a Leslie’s Opening Kit can help your pool opening process go more smoothly. Opening Kits include a stain and scale preventative, pool shock, algaecide, and clarifier. Deluxe and Premium kits also include enzymes to help keep the pool cleaner and prolong the lifespan of your chlorine, as well as a phosphate remover to help prevent algae.

  • Add the stain prevention product first, then wait at least 4 hours.
  • Test the water and balance total alkalinity (80–120 ppm) and pH (7.4–7.6).
  • Add your pool shock to get free chlorine levels up to at least 1–4 ppm, then let the pump continue to run overnight.
  • The next day, add algaecide, then wait for at least 2–4 more hours.
  • A clarifier will help your filter clean up the water faster.

Let the pump continue to run for at least four more hours after adding a clarifier. Then, if needed, vacuum the pool again. While the pump is running, check the filter pressure often. Make sure to clean or backwash the filter as needed during the start-up process. If you have enzymes, add them to the pool once chlorine levels are back under 5 ppm, then let your filter pump continue to run for another 48 hours.

8. Begin regular pool maintenance

Once you’ve followed all the above steps, bring a water sample to your local Leslie’s for a free in-store AccuBlue® water test and customized treatment plan so you can manage the water chemistry after you open your pool. This will help you make any final adjustments before allowing swimmers to jump in and enjoy the pool!

9. Consider your pool’s water temperature after opening

Whether you have a heater, a heat pump, or neither, solar pool covers can help keep heat in the pool. In fact, depending on the thickness of the cover, they can increase the water temperature up to 15ºF on their own.

10. Don’t forget the fun!

This is the moment you’ve been waiting for — it’s time to dive in and enjoy the pool! A freshly opened pool is the perfect excuse to bring home a fun new inflatable float, cozy pool lounger, or some exciting backyard games.

Need help opening your pool? The experts at Leslie’s can help with pool opening services and supplies. Leslie’s Opening Kits contain all the chemicals necessary for getting your pool back up and running. They’re packaged according to pool size for simple application.

For more tips, information, and products to help keep your pool in top operating condition all season long, visit LesliesPool.com.

Want a cleaner, fresher wardrobe? 5 ways to up your laundry game

2023-04-05T16:01:00

(BPT) – Spring is finally here, which means it’s the perfect time to refresh and recharge, and that goes for your home as well. With National Laundry Day falling on April 15, it’s a great time to revise and update your laundry space and routine. Washing and drying your clothing may seem simple, but just a few changes to your routine can keep your clothing cleaner and help it last longer. Take your laundry game to the next level using these five time-saving tips.

1. Have the right accessories on hand

Doing laundry the right way takes more than just using a detergent, washer and dryer. You’ll need the right accessories to properly wash and dry your clothing, especially delicates.

Try putting your delicate clothing in mesh laundry bags before throwing it in the wash. Mesh bags keep delicates from tangling or snagging during washing, preventing damage and premature stretching.

Wool dryer balls are also good to have on hand. They’re an eco-friendly replacement for dryer sheets that create air pockets between clothing while bouncing around the dryer. Not only do they speed up drying and reduce static, but they can also help reduce wrinkles and odors. You can even place some drops of essential oils on the wool balls for a fresh smell.

2. Upgrade your washer and dryer

An efficient washer and dryer can make doing laundry easier and help your clothing last longer and stay cleaner. If it’s time to replace your washer and dryer, look for a durable top-load washer with cutting-edge technology and a complementary dryer.

A reliable and powerful washer and dryer combo to consider is the LG Smart Top Load Washer and Smart Dryer. The washer’s TurboWash3D technology allows you to finish large loads in just 29 minutes, while the 4-Way agitator and TurboDrum technology provide a thorough, gentle clean.

To make things even easier, the LG Smart Pairing feature sends information to the dryer so when you’re ready to move things over, the dryer automatically recommends the best drying settings, saving you time and guesswork.

Both the washer and dryer can be controlled using the ThinQ app. Whether at home or out running errands, you can use the app to manage and monitor your laundry progress remotely. If any appliance issues pop up, Smart Diagnosis will alert you and provide solutions to solve problems on the spot.

3. Sort your laundry with hampers and bins

Before you start the wash, pre-sort your laundry into hampers or bins. You can separate by color, fabric type and care label instructions. This will simplify and speed up the washing process while preventing laundry accidents.

For example, washing darks and lights separately helps prevent darker colors from bleeding into lighter-colored fabrics. Washing delicates on their own on a gentle, cold cycle will extend their life. You can then wash another load of towels and blankets on a hot cycle to thoroughly clean them without damaging other items.

After a round in the dryer, you can use the same bins to separate clothing by type, such as tops, bottoms, socks, etc. or by who it belongs to.

4. Invest in a steam closet

Caring for hard-to-clean items can be time-consuming and tedious to get the results you want. However, investing in a steam closet can make clothing care easier and keep your clothing in better condition.

A steam closet like the LG Styler sanitizes, deodorizes and freshens clothing using chemical-free TrueSteam technology. This means you can easily care for delicates and dry-clean-only items without taking them to the cleaners, saving money and time.

If you have clothing that you’ve worn and plan to wear again in the week, just toss it in the Styler. The steam closet’s unique moving hanger system releases light wrinkles while freshening and removing odors. The Styler also makes it simple to sanitize awkwardly shaped items like throw pillows, jackets, toys and backpacks.

Like the smart washer and dryer, the Styler features ThinQ technology, so you can start and monitor cycles from your phone, troubleshoot problems, and even use voice commands with Google Assistant and Amazon Alexa to control the steam closet.

5. Use less detergent

A common misconception about laundry is that using more detergent will make your clothing cleaner. However, using more detergent than necessary can leave a soapy residue, leaving clothing looking dull and stiff and can even fade your clothing. Also, if you have sensitive skin, the soap residue may cause irritation. Plus, using less detergent will save you money in the long run, as you won’t have to restock as often.

A few changes can make a big difference. Using these five tips, you can improve your laundry routine for a cleaner, fresher wardrobe on National Laundry Day and beyond.

5 ways to improve your home’s value and appearance with a spring refresh

2023-04-05T08:01:00

(BPT) – With the arrival of spring comes renewed inspiration to clean out the cobwebs, get out in the sunshine — and tackle much-needed home improvement projects. Too often we limit the “spring cleaning” energy to overlooked closets, but some of the best opportunities are just outside your home’s four walls. Spring is the perfect time to refresh your home’s exterior, not only to impress your neighbors but to boost your pride in your home — as well as its value.

Whether you plan to stay for many years or plan to sell soon, you don’t have to do a major overhaul to make improvements that offer a great return on investment, enhance your home’s energy efficiency and make it the best-looking house on the block.

Here are five high-impact ways to revamp your home’s exterior this spring.

1. Give your landscaping a makeover

Photo courtesy JELD-WEN

Before everything is fully in bloom is a good time to assess what’s working in your yard, and what’s not. Start the season with a clean canvas by picking up leaves, sticks, branches and other debris that may have been collecting in your yard over the long winter months.

You could even make room to add a few colorful new plants or start a vegetable garden. Start planning your flower, vegetable or herb gardens by deciding whether you’ll use containers, raised beds or plant in ground. Use native plants that will thrive in your region all season long and consider the level of upkeep based on your lifestyle. Look for inspiration online and select plants that will complement your home’s exterior or consider coordinating colors with the front door.

2. Welcome visitors to your home with new doors

Photo courtesy JELD-WEN

What’s the first thing people notice about your home? Your front door — also known as the perfect backdrop for those “first day of school” photos coming in just a few short months. Upgrading to a new front door makes a big difference, offering an unmatched opportunity to completely change the look of your home’s exterior with an on-trend paint color or stain and an updated design that’s right for your home. A well-designed door can elevate your home’s style and curb appeal, withstand the elements, and provide better energy efficiency and security.

For example, JELD-WEN fiberglass exterior doors use advanced materials to prevent moisture from getting in the door — which helps prevent rotting, warping and cracking, offering more durability than a wood door. Their high-density polyurethane foam core is energy efficient, offering five times more insulation than solid wood doors, helping you save money on your energy bill. Plus, you can choose your finish hardware and glass for a fully customized look that matches your home’s style.

JELD-WEN Smooth-Pro Fiberglass Doors have a light brush-stroke texture that can be painted any color. For a more classic look, JELD-WEN Design-Pro Fiberglass Doors are created to resemble the beautiful, natural look of real mahogany, oak or fir woodgrains, featuring high-definition panels with wider profiles to provide more depth and authenticity. Find the option that best suits your style at JELD-WEN.com.

3. See the world clearly through new windows

Photo courtesy JELD-WEN

Your front door is only part of the curb appeal equation. New windows can also have a big impact on the overall look and functionality of your home. Window technology has evolved by leaps and bounds in recent decades, and if your windows haven’t been replaced since cassette tapes were in vogue, your home could benefit from the improved energy efficiency and security new windows can provide.

Window choices can be overwhelming, so it helps to consider your main goals in the most important rooms in your home: will you open and shut them frequently? You also want to consider the best overall style to complement the house. If replacing all the windows is too big of a project for your schedule or your budget, consider replacing any showing signs of disrepair, windows facing the front or those most often used. JELD-WEN offers consumers more information about replacing windows to last.

4. Improve your indoor-outdoor living

Photo courtesy JELD-WEN

Does your outdoor space have enough areas to sit and relax? You don’t need a new deck or patio to maximize your yard, but adding shade with a sun sail, pergola or gazebo are just a few options to make your outdoor space more livable. Creating a focal point with a fire pit or water feature can make the space work that much harder for you.

Do you have older lawn furniture that doesn’t exactly invite people to sit and sip tea on a warm afternoon? Ideal furniture is sturdy enough to weather the elements and comfortable enough to keep guests chatting rather than looking for an excuse to call it an early night. Benches and swings are other options to consider for additional seating.

Have you already updated your backyard and outdoor landscaping? Consider remodeling or replacing the entry door between your outdoor and indoor living spaces to maximize the natural light in your home and improve the views of your new outside living area.

5. Shine a light on your home

Photo courtesy JELD-WEN

When did you last update your home’s lighting? Well-designed lighting makes your home more attractive to guests, especially on warm spring or summer evenings, but good lighting choices — including motion sensors — also impact your home’s security. Walk around your home at dusk to notice areas that could benefit from security lighting, as well as spots where you’d like to hang out with friends and family.

No matter your price point or spring-cleaning schedule, there are options to help your home look its best for the new season.

10 ways to create a cool under-deck living space

2023-04-05T08:01:00

(BPT) – Many homeowners don’t realize that the space below a deck can offer tremendous potential. With a little creativity and the simple addition of an under-deck drainage system, the area beneath a deck can be used for almost anything, from additional living space to discreet and waterproof storage. Using a network of troughs and downspouts, an easy-to-install system like Trex® RainEscape® captures and diverts water away from a deck, protecting the area underneath from the outdoor elements and allowing for it to be outfitted with everything from furnishings and accessories to ceiling fans, lighting, appliances and entertainment components.

Here are 10 ways to make the most of this bonus outdoor space:

Bring the indoors out.

By protecting the area beneath a deck, you can virtually double your outdoor living space. This patio incorporates a seating area, dining table, and an outdoor kitchen, creating a setting well-suited for any outdoor occasion.

Dine al fresco.

An al fresco dining area takes any meal from ordinary to extraordinary. Think beyond the traditional grill and patio furnishings to create an elegant, open-air gathering spot. Incorporate soffit lights into the ceiling to enhance ambiance and extend the usability of the space.

Watch the seasons change.

Why create a space you can only enjoy for a few months? By enclosing the area beneath an elevated deck with windows and screens, you can enjoy the great outdoors in comfort no matter the season or the weather.

Get cooking.

There’s no need to miss a moment of fun with a fully equipped outdoor kitchen. With the Trex RainEscape system, gas lines and electrical wiring can be run safely and discreetly between the deck surface and a soffit ceiling to accommodate whatever may be on the menu.

Soak in serenity.

If you love spending time outside, even during winter, a hot tub is a great addition that works with any size deck, so long as the overhead space is larger than the tub. This protection from the weather means you can enjoy a relaxing soak whether there’s sun, rain or snow.

Create an under-deck café.

Let’s say you enjoy the idea of dining outside, but you’re not up for a full-blown outdoor kitchen. Consider opting for an outdoor cafe-style area. This design turns a stone wall into a countertop for enjoying morning coffee, a cocktail or even a meal.

View with a view.

Shielded from the elements and outfitted with comfortable furnishings, a wet bar, and a mounted flat screen television, this space offers an oasis for watching movies, sports or binging your favorite shows with family and friends.

Factor in fun.

If you’re tight on space underneath the deck but still want a design element with unique flair, installing a swing is a fun addition. A swing doesn’t take up a huge amount of space and is the perfect spot to enjoy a breezy afternoon.

Keep it cozy.

Whether hosting a wine night for friends or having a night in with your family, incorporating a fireplace into your underdeck area creates a pleasant spot to enjoy a night of fresh air, while ultimately elevating the ambience.

Store in style.

When properly protected, the space beneath a deck is ideal for storage. Seasonal items such as pool equipment, gardening tools, patio furniture and yard games can be safely tucked away. Size permitting, this space can even be used to house grills, lawnmowers, bicycles, ATVs and snowmobiles.

For more ideas and information, visit TrexRainEscape.com.

New tax credits can help you improve your home and transition to clean energy

2023-04-04T09:01:00

(BPT) – America has begun the transition to a clean energy future, but what does this mean for you and your family — and what smart energy choices can you make to significantly increase your home’s efficiency and make a difference in protecting the climate?

Clean energy is generated from renewable sources without producing any pollution, which helps to improve the health of the environment and reduces the amounts of harmful emissions people are exposed to. Electricity made from clean energy can power appliances, heat and cool homes, and fuel transportation.

On the other hand, burning fossil fuels like coal, oil and gas, either at the power plant or in your home or car, results in greenhouse gas emissions that contribute to global warming and air pollution that impacts human health and the environment.

Benefits of clean energy abound — shifting to electricity generated from renewable sources of energy is important to slow down global warming and protect the environment from harmful smog and toxic buildups in the air and water. Using renewable sources of energy also helps conserve natural resources and reduces dependence on foreign oil.

At the same time, using energy efficiently is important to ensure there is ultimately enough clean energy supply to meet the demand. Here are some key steps you can take to be part of the clean energy future.

Step 1: Make efficient electric upgrades to your home

Start planning an ENERGY STAR Home Upgrade, which is a set of six high-impact, energy-efficiency improvements for your home that include upgrading to electric heat pump technology for heating, cooling and water heating. Working together to deliver significant energy and cost savings, an ENERGY STAR Home Upgrade is designed to help you transition from fossil fuels for an energy-efficient, healthier and more comfortable home.

For the average American household, almost half of the annual energy bill goes toward heating and cooling — approximately $900 a year, according to the U.S. Environmental Protection Agency. Therefore, finding ways to efficiently heat and cool your home — such as switching to a super-efficient heat pump for heating and cooling and integrating a smart thermostat for more efficient energy usage — is key to reducing energy usage and saving money year-round.

After heating and cooling systems, your water heater is the second largest energy user in your home and uses more energy than your refrigerator, clothes washer, dishwasher and dryer, combined. Given the energy intensity of water heaters, switching to an energy-efficient heat pump water heater, specifically one that has earned the ENERGY STAR label, can save you hundreds of dollars on your yearly energy costs.

Finally, you’ll want to pay attention to your home envelope and make sure to seal any air leaks and check for adequate attic insulation. These changes alone can save homeowners an average of 15% on heating and cooling costs — or an average of 11% on total energy costs — by air sealing key areas around your home such as attics, crawl spaces and basements, and making sure your attic is well insulated.

Step 2: Switch to green power

Choosing electricity generated by renewables, such as wind and solar, instead of fossil fuels, supports a cleaner energy supply and makes a difference in the fight against climate change. Take advantage of opportunities in your community to choose green power as the energy source for your home.

Step 3: Switch to an electric vehicle

Driving an electric vehicle can save you money and benefit the environment. For every mile driven using electricity, you can save half of what it costs to drive a similar gasoline-powered vehicle. On average, the savings can be $800 to $1,000 a year on fuel and $4,600 on maintenance over the vehicle’s lifetime, according to Consumer Reports.

Fully electric vehicles are also quieter than gasoline-powered vehicles and produce zero tailpipe emissions, helping you significantly decrease the level of toxic chemicals and greenhouse gas emissions emitted from your car.

How to save on green home upgrades

The Inflation Reduction Act is making it more affordable for families to purchase energy-efficient equipment, make repairs to their homes and save money on their utility bills each month. New federal income tax credits are available through 2032, providing up to $3,200 annually to lower the cost of energy-efficient home upgrades by up to 30%.

Combined with utility rebates offered in many parts of the country, these incentives could significantly reduce the cost of making energy-efficient improvements to your home. Learn more at Energystar.gov.

6 tips to keep your home’s basement protected from water damage this spring

2023-03-30T08:01:00

(BPT) – Springtime’s melting snow or heavy rain can cause sump pump problems and sewer backups for homes with basements or crawl spaces. Damage from either can be costly, because sewer backup and sump overflow are excluded from standard homeowners insurance policies. Fortunately, most home insurers do make this coverage available by endorsement.

“Independent insurance agents sell this coverage to about 85% of all homes written with Acuity,” said Bob Hertel, director of personal lines product development at Acuity Insurance. “Many homes written with other insurers do not include an endorsement to cover losses caused by sewer backup or sump overflow.”

Many municipal sewer systems are outdated, and flooded streets can quickly cause severe water damage to basement walls, flooring, furniture and other personal property. Sump pump maintenance is often ignored until water overflows into the basement. Standing water isn’t just difficult to handle, it can be costly too. Over the past five years, Acuity Insurance’s average claim payment for sewer backup is $6,787 and sump pump coverage claims average over $7,630.

Consider these tips to help protect your home from sump pump problems and sewer backups this spring:

  • Buy a special endorsement that includes coverage for sump overflow and sewer backup. This endorsement will cover your home and personal property in the event of water damage from a sewer backup or sump overflow.
  • Test your sump pump at least once each year. A simple and effective way to test your sump pump is by pouring water into the sump pit. If the pump does not run, it needs cleaning, repair or replacement. If it requires maintenance, consider assistance from a licensed plumber.
  • Replace your pump. Sump pumps typically should be replaced every five to 10 years. Preventive maintenance is key to your system’s longevity. If you don’t stay on top of it, you might not notice that your pump needs to be replaced until you need it most.
  • Consider purchasing a battery backup sump pump and an alarm system. A backup battery or generator will ensure your pump does not fail in the event of a power outage. Sump pump alarms are designed to alert you when your sump pit is at risk of overflowing. Many types of alarms are available, with prices ranging from about $12 up to several hundred dollars for an advanced Wi-Fi system that sends warnings to your smartphone.
  • Consider the value of your basement. Hertel notes that Acuity Insurance’s most common endorsement limit is $5,000, but this is probably not enough for a finished basement. Most companies offer limits up to $25,000 or more. To determine an appropriate limit, consider what it would cost to replace water damaged walls, floors, furniture and other basement-kept personal property.
  • Ensure the sump pump discharge pipe discharges water far enough away from your house. If the sump pump discharges water too close to your house, the water will seep right back in and cause unnecessary wear on your pump. Ensure the sump water is discharged downhill and far enough away from your house for adequate draining.

“Preventing water from backing up into your home is an important task,” Hertel said. “Make sure your home is protected by taking preventive maintenance steps. Even with the best maintenance, some water backup losses cannot be avoided. Contact your independent agent to ensure you have appropriate coverage and limits in case something goes wrong.”

Natural inspiration: 5 ways to maximize the goodness of gardening

2023-03-24T08:01:00

(BPT) – Did you know gardening can have a significant, positive impact on people’s lives? During the pandemic, 18 million new gardeners turned to their outdoor spaces to relieve the stress and anxiety caused by isolation. In addition to the calming effect that working in and visiting gardens can have on mental and physical health, gardening also teaches valuable life skills. For example, at a community garden in Detroit, homeless women and mothers gained confidence and self-reliance by learning how to grow their own vegetables.

Here are five vital ways gardening can enhance your well-being, along with just a few examples of how they’ve changed many lives for the better.

1. Boost your physical health

Working in your garden is a great way to be more active. According to the CDC, gardening is the second favorite physical activity of older adults (behind walking), providing moderate physical activity which may help reduce stress, lower your blood pressure and maintain a healthier weight — all factors that can reduce your risk of heart disease, among other benefits. Being outdoors helps you obtain vitamin D from sunshine, boosting your mood and contributing to your body’s ability to absorb calcium, which is crucial for bone health, according to the National Institutes for Health. Physical therapy in a garden setting is a proven technique for faster recovery times. As an added bonus, you can grow vegetables and fruits for a more nutrient-rich diet.

2. Make social connections

At a vocational therapeutic garden in Chicago, one young man with autism relearned how to communicate verbally after years of being unable to use his voice. This helped him socially, as well as enabling him to get and keep a job. To create your own social connections, try joining (or volunteering at) a gardening club, working in a community garden or chatting with a neighbor while you’re working in your yard.

3. Stimulate your brain

Gardening keeps your brain active. Planning your garden, researching plants and methods to help them thrive all increase your scientific knowledge. Learning how plants grow, understanding their life cycle and their impact on pollinators are all vital for appreciating what the earth needs — and how everyone can contribute. At a prison in Texas, they’ve reduced the recidivism rate from 35% to 4% thanks to the job training skills parolees learned during a one-year horticulture training program that enabled the parolees to get and keep jobs after release.

4. Grow your mood

The Japanese concept of “forest bathing” means immersing yourself in the natural world. Japan made this part of their national health program due to research showing the many health benefits of being in nature. The therapeutic benefits of gardens are widely appreciated, which is why you see therapeutic gardens at hospitals, rehabilitation centers, hospices and other facilities. Research reveals that those who spend time outdoors may experience better recovery, less anxiety or depression and reduced reliance on pain medication. Children in a homeless center in Dallas were given the opportunity to work in gardens, leading to a marked reduction in their aggressive tendencies caused by the uncertainty in their lives.

5. Elevate your experience

For many, spending quiet time in nature also helps foster a feeling of connection with all living things. Gardens have long been a feature of spiritual retreats and sanctuaries. If you want to experience calm and tranquility, gardens provide uplifting, serene environments that can help you attain that sense of inner peace.

Create your ideal garden

Knowing what an impact gardens and gardening has on people’s lives, you may be inspired to create your own, or to reimagine your existing garden. Want to enhance your physical well-being? Grow healthy food, or expand your garden to provide more opportunities for exercise. Looking for connections? Join a garden group or invite friends to garden with you. Aiming to stimulate your brain? Research what grows best in your region or learn about new plants. Interested in boosting your mood? Plant colorful flowers that make you smile and create spaces to relax and enjoy nature. Want to feel uplifted? Create a sanctuary with space for practicing yoga or meditation.

With a little planning, work and time, you can make the most of your garden this season, and you’ll be reaping the benefits for years to come. Learn more about the goodness of gardening at NationalGardenBureau.org.