House hunting? Use this handy checklist before you make the offer

2018-02-21T08:01:00

(BPT) – House hunting can feel like an adventurous new chapter in your life. If you’re lucky enough to find the property that checks off all the “must have” boxes — appearance, size, price, location — it’s easy to fall in love.

Not so fast. Before making an offer on any property, it’s smart to take a deeper look at the overall structure and its systems, just to make sure warning signs of major and costly problems are not hiding in plain sight. If the house holds more issues than your budget (and drive to renovate) can handle, it might be best to walk away.

Of course, once the offer is accepted, it’s always a smart idea to hire a third-party home inspector to take an in-depth look at the property. In the meantime, one last pass-through with this checklist in hand can give you peace of mind about taking the next step.

Exterior: Walk around all four sides of the house, scanning it from ground to rooftop. Note the condition of the doors and window frames, and look for cracked or peeling paint or signs of loose siding. Higher up, eye the chimney, making sure it appears straight and is in good condition, while the gutters and drainpipes should be in place and functional.

Roof: Ideally, the roof would be 10 years old or less, so scan the roof for the classic warning signs of aging and neglect. Things like curled and missing shingles, dark stains, moss growth and signs of sagging can signal serious issues. (A home inspector can confirm if full replacement is needed, or if a few simple repairs would stabilize things for another decade or so.)

Yard: Take note of the landscaping. Is there a slope angled away from the house, or is there a potential for a flooded basement after a major rainfall? Mature trees provide lots of shade, but watch for overhanging branches, as these can break off in a storm and do major damage to the roof. Finally, take note of the condition of the driveway and sidewalks.

Foundation: The sight of a few hairline cracks in the cement is no cause for panic. Do look for telltale signs of serious issues, such as widening cracks, water stains and bulges. It doesn’t hurt to bring a level to make sure the walls are straight.

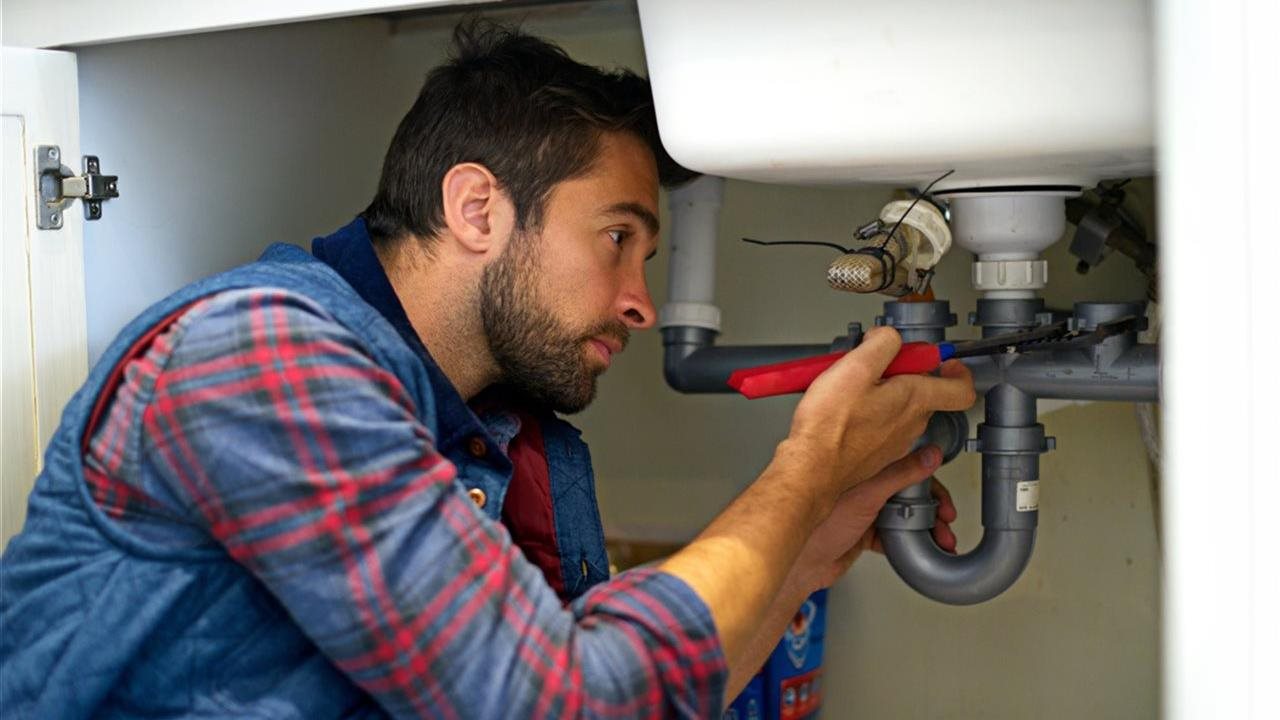
Plumbing: In addition to checking basement and under-sink pipes for signs of leaks, scan the ceilings for water stains. Open all the faucets to check the water pressure as well as the time it takes for hot water to reach the tap.

HVAC system: Know the age of the heating and cooling systems, and check these for tags and other signs of routine maintenance. If the system is older than a decade, that can spell costly repairs and a replacement in a brief time frame. When it comes to older systems, energy efficiency is another consideration, according to Tom Tasker, product manager with Coleman Echelon Variable Capacity residential systems.

“Newer HVAC systems are remarkably more efficient when compared to those from even a decade ago, which means they keep your house comfortable for as little as half the cost,” says Tasker.

For example, Coleman’s Echelon products are rated up to 20 SEER, which stands for seasonal energy efficiency ratio. Compare these to the 10 SEER systems of 25 years ago, and that can give you an idea of what to expect in potential energy costs, he says.

Appliances: Note the age and condition of things like the refrigerator, oven and range, washer and dryer, and hot water heater. As with the HVAC, older appliances tend to consume more energy and you’ll face a shorter timeline for needed repairs and replacements.

Buying a house is a big decision, but knowing what you’re buying can go a long way in assuring you that you’ve found the right place!


DIY tips for homeowner tile installation

2018-04-09T09:01:00

(BPT) – A bathroom remodel is on the agenda for 31 percent of homeowners in 2018, according to a survey by Lightstream, a national online lending division of SunTrust Bank. Those remodeling efforts can take many forms, but arguably the most dramatic and impactful upgrade to a bathroom is installing a new tile floor. While that may sound like a complicated undertaking that is better left to a pro, with a few simple tips, even homeowners with modest do-it-yourself experience and skill can successfully install a reasonable-sized tile bathroom floor. Even in cases where a homeowner ultimately decides to hire a pro for the job, understanding some basic tile installation practices and principles will make the project less daunting and the overall experience more positive.

Note: These tips give homeowners useful insights to consider when installing a tile bathroom floor, but do not cover every detail of the process. Homeowners should always consider local building codes and Tile Council of North America guidelines before starting any tile installation project.

* Measuring the floor — Calculate how many square feet of tile you will need, being sure to consider voids and curves for the toilet, vanity, bathtub and/or shower. Always round the measurements up to the nearest foot and then add 10 percent to avoid running out of tile.

* Preparing the surface — Remove the existing floor to include adhesives, mortars or other residues. If the substrate is concrete, patch or level it so the surface is smooth and flat. If the subfloor is wood, attach a cement backerboard like WonderBoard Lite before installing tile. Applying a waterproofing material like RedGard Crack Prevention and Waterproofing Membrane is recommended to combat the moisture and water exposure in a bathroom.

* Designing the floor — Lay out the tile in the desired pattern to determine required cuts and confirm accuracy of measured dimensions. Create a layout guide representing the pattern by popping chalk lines on the floor starting at the walls and working into the middle.

* Selecting the mortar — Choose a mortar designed for the specific type and size tile on the installation. Tiles longer than 15 inches on any side are very popular these days and require the use of large format tile mortar like ProLite that has non-slump properties to prevent lippage. After selecting the right size notched trowel, apply the mortar on the clean, dry surface in one direction to form straight, parallel lines before applying the tile.

* Selecting the grout — Choose a single-component grout like Fusion Pro that requires no mixing so filling joints is easy and fast. In addition, this single-component grout has unmatched color consistency that won’t fade and is stain proof so applying a sealer isn’t necessary. To make sure the grout color matches the tile, conduct a test by filling the joints between four tiles on a small piece of backerboard to simulate the larger installation.

* Caring for the floor — Always use pH neutral cleaning products like TileLab Grout & Tile Cleaner designed to remove dirt, stains, mold and other unwanted contaminants from tile and grout without etching, discoloring or otherwise harming the surface.

In addition to potentially saving thousands hiring a pro, the gratification and pride a homeowner enjoys after remodeling a bathroom with a new tile floor is irreplaceable. Of course, homeowners should always follow the instructions on product packaging before use so the project goes smoothly and all warranty requirements remain intact. For comprehensive details on every phase of tile installation, visit the Custom Building Products website at www.custombuildingproducts.com.


When to introduce tech to children

2017-12-13T10:25:00

(BPT) – If you’re a parent with a smartphone or tablet, it didn’t take long before your little one first reached for your shiny device. If only their fingers weren’t covered in slobber at the time, you may have been more willing to hand it over. The good news is that saliva is easy to wipe off! S’mores? Not so much.

To your surprise — and theirs — learning how to swipe and tap objects to make them move on the screen came quickly and naturally. Oftentimes the challenge soon becomes how to keep their hands off the device. It’s perfectly acceptable, even beneficial, for young children to have these interactions with technology … but only with appropriate parental guidance.

How young is too young?

Young children can strengthen their interactions with other family members, as well as improve their familiarity with sounds, words, language and the world around them, through the responsible use of technology. Most experts agree, however, that children under the age of 2 probably shouldn’t trade their rattles in for tablets. There are enough real-world interactions to keep them busy, and whether they play with blocks or pull the cat’s tail, these tangible experiences are important to their development. There will be plenty of time to show them Angry Birds when they’re a bit older, so allow them to develop their senses by exploring, touching things and even getting into a little mischief.

Once beyond the 24-month mark, you can begin introducing technology to your little tyke. Chances are he or she may already enjoy the privilege at preschool; many toddler day-care centers and preschools now incorporate technology, from computers to tablets, into their curriculum.

Kids’ access to digital media

Whether at school or at home, most youngsters interact with screens before they turn 5. According to a survey conducted by the Joan Ganz Cooney Center, more than eight in 10 children from age 2 to 10 use digital media every week. In fact, two-thirds have tablets or e-readers. While the interactions are practically inevitable, significant parental and caregiver involvement can help steer them in the right direction, ensuring kids are exposed to content providing the best opportunities for learning.

Between laptop computers, desktop PCs, tablets, televisions and smartphones, there’s probably a screen in nearly every room of your home. Although these screens can and often do serve as virtual babysitters, games, apps and other content should be carefully selected, and screen time should be limited to an hour or less a day for toddlers.

Parental involvement

By using technology with your children, you’ll introduce them to the most beneficial content, while also bonding with them over an exciting, shared experience. Something as simple and fun as taking turns in a game or reading together on a tablet can also help ensure technology is being consumed in a responsible way that can educate and aid development.

While education is key, it doesn’t always have to be about learning your ABCs and 123s. Plenty of games and apps combine learning and entertainment experiences that are fun for kids. Checking the ESRB age and content rating information in console and online stores (like the Nintendo eShop, the PlayStation Store, the Xbox Store and Windows Store) is a great way to find appropriate games for kids of all ages. ESRB ratings are also assigned to mobile games and apps in the Google Play Store, complete with content descriptors and interactive elements when applicable.

As your little ones mature from toddlers to tweens, their use of technology as well as the technology itself will certainly evolve. The breadth of content they enjoy will greatly expand, highlighting the importance of parental involvement in managing and monitoring their time with tech. Regardless of where our smartphones and tablets take us, parental involvement and engagement is key to ensuring kids enjoy a healthy, responsible relationship with technology.


Smart home update 2018: New products that organize your life through voice

2018-01-10T11:01:00

(BPT) – The artificial intelligence that’s already taking the world by storm is ramping up even more in 2018, enabling a number of innovative new smart home tools that can make your life easier, more comfortable or just more fun.

Throughout the year, consumers worldwide are expected to spend $102 billion on hardware, services and installation related to smart home systems, an amount expected to ramp up to $157 billion by 2022. The number of connected things installed in smart cities by next year? Nearly 1.1 billion, predicts Statista. Increasingly, people will enjoy the convenience of being able to monitor and control their surroundings with a simple touch or a few words of direction. In fact, a 2017 study found 24 percent of consumers already own a voice-controlled device and another 20 percent plan to purchase one in the next year.

“Pretty much anything can be made smart these days,” notes Bernard Marr in Forbes. “For our homes, there are obvious smart products like TVs and less obvious ones, like yoga mats that track your Downward Dog. We can carry out a whole range of tasks on the move simply by touching a screen.”

Some of the hottest smart home products that have recently debuted:

* LG’s entire line of OLED TVs is now AI enabled. They also let you speak right into the remote control so with one word, you can check weather reports, search for content from over-the-air or streaming sources (including Netflix, Amazon, Hulu or YouTube), order items through Google or even control other IoT devices within your network. Even better, LG Electronics has invented a next-generation OLED TV that combines the most powerful A9 Intelligent Processor created with Atmos audio technology. The result? The LG SIGNATURE OLED TV W8 offers stunningly clear and detailed pictures, cinema-quality sound and ultra-fast response times.

* Seeking the smartest refrigerator on the market? The Wi-Fi-enabled LG ThinQ InstaView is the first to offer built-in Amazon Alexa that responds to your spoken directions by creating to-do lists and grocery lists, ordering the groceries themselves, controlling your refrigerator settings, playing the music of your choice and otherwise stepping up to make your life easier. A convenient touchscreen panel lets you instantaneously peruse the weather, recipes, shopping sites or the contents of your fridge — without losing energy by opening the door.

* Hands-free speakers with voice-activated assistants such as Google Home and Amazon Echo are helping tens of millions of people worldwide efficiently manage their lives by interacting on command with everything from home appliances to entertainment systems to information sources to online shopping venues.

* What’s for dinner? Recipe apps like SideChef and Innit already deliver fast and intelligent answers to that age-old question, giving everything needed to plan and prepare the next meal. Voice-controlled AI takes this to the next level. Innit is now connected to some models of smart ovens, and for SideChef that feature is coming online in 2018. What does that mean for home chefs? When they speak to the oven to start heating, it will already know those roasted veggies need 25 minutes in a 425-degree oven.

* In its latest version, the Bluetooth music headset that may already be a staple of your life allows you to access the Google Assistant by voice so you can instantly access a range of functions beyond just music. The LG TONE PLATINUM SE lets you request and receive notifications and answers to questions, send text or audio messages and more while you’re on the go.

Thanks to the continual evolution of technology, we can start the new year with fun new products aimed at making our lives more efficient, organized and enjoyable. And that pattern should only continue into the future.

“Already, many of us wake up in our ‘smart beds’ to a Bluetooth-connected alarm clock that communicates with our WiFi-enabled speakers,” notes marketing consultant A.J. Agrawal in Entrepreneur. “Soon, all our devices — microwaves, washing machines and even bird feeders — will be connected to the web. With geospatial data from all of our devices, tech-savvy companies will be able to optimize and automate systems, eradicating inefficiencies caused by human error.”


Tips to tackle 5 of the most satisfying DIY projects

2018-01-24T10:04:00

(BPT) – What’s your favorite DIY project you’ve ever completed? Chances are the answer pops right into your mind, and even if you’ve completed hundreds of DIY projects over the years, you probably have some that truly stand out.

For those that weren’t at the top of your list, maybe the result wasn’t what you hoped for, the project wasn’t particularly rewarding or you’ve done it before.

The following five projects might be new to your list, but they are sure to improve your home and become your new favorite DIY achievement.

* Clean your water with a new filter system. Cut the costs and clutter of bottled water while being environmentally conscious with this project. Breach your current water line to solder in a new shut-off valve, drill a new faucet hole and attach this line to the filter and you’ll be enjoying filtered water in no time. U.S. landfills are already overflowing with more than 2 million tons of discarded water bottles. You can enjoy peace of mind knowing that you’re not adding to them.

* Breathe easier. Why stop at clean water in your home when you can also enjoy cleaner air? Renting an air scrubber can allow you to remove invisible — yet unhealthy — gases, particles and chemicals from your home’s air. Your local rental supply store will help you find the right air scrubber for your area to be sure you’re removing the pollutants that matter most.

* Update and refresh your ceilings. Popcorn is great at the movies. On your ceiling? Not so much. Spray your ceiling with warm water, and scrape away the popcorn itself with a drywall scraper. Collect these contents on a tarp and toss them. You’re then ready to patch any holes caused by overzealous scraping before priming and painting your brand-new ceiling.

* Give your furniture a facelift. If that upholstered furniture isn’t looking as sharp today as it once did, don’t settle for it or replace it. Rent an upholstery cleaner instead and give each piece of furniture a once-over. This simple project can dramatically improve the look of your most cherished pieces and save you considerable money over a costly replacement.

* Let there be light. If natural light is a problem in your home, it could be that your window treatments are to blame. Large drapes and curtains can give your home a dated look and rob your rooms of the light they need. Instead, lose these old window treatments and install vertical blinds or shutters. These new, lighter treatments will give you better control of the light and privacy in your home than their older counterparts.

Tackle your new project today

Five new projects. Which one speaks to you? There’s nothing stopping your progress, and each completed project benefits you, your family and your home.

To find rental locations near you that can supply you with the tools you need to complete your DIY projects, visit RentalHQ.com.


5 ‘smart’ ways to tackle your spring cleaning

2018-02-23T12:27:03

(BPT) – Pull back the drapes, crack open the window and let in the warm, sun-soaked air. That’s right, spring is right around the corner and that means it’ll soon be time to chase away the grime and odors that have settled in over the long winter.

For many, spring cleaning is something of a tradition, a ritual. But things have changed. The days of dipping an old mop into a tin bucket filled with gray water belong to another era. In the age of smart cars and smartphones, cleaning has become smarter as well.

Here are a few smart innovations that will make your spring cleaning routine much more efficient and thorough.

1. Freshen up your style. A change in seasons is the perfect time to change up your wardrobe. Take advantage of this transitional period to purge items you haven’t worn in 12 months or more — be honest with yourself! When you’re free of unnecessary items, indulge in a trip to a specialty store offering storage and organization products to uncover new space-saving solutions. Unsure of what to get rid of? If a beloved item just needs a little love, run it through a steam-powered clothing care system like the LG Styler or delicates cycle in the LG TWINWash system — both certified by AAFA as asthma and allergy friendly(R) — to see if it’s salvageable.

2. Breathe easy. It’s easy to spend the lion’s share of your time trying to tackle the stains, dust and smudges in your home. However, one of the most important parts of your home to clean is the part you can’t see. We’re talking about air quality, of course. Opening windows and placing plants around your home is a good way to start, but if you really want to get serious, put an LG PuriCare Air Purifier to work. With sensors to monitor the air quality, this cutting-edge purifier is certified by the Asthma and Allergy Foundation of America, and is perfect for anyone who suffers from allergies.

3. Multitask like never before. By now, most of us are familiar with robot vacuums. Having one of these zoom around your home on cleaning days frees you up to do other things, saving you time and making manual vacuuming a thing of the past. Over the years, the technology has advanced so that nowadays these nifty cleaning assistants are quieter than ever before — some even come equipped with a camera to monitor your home while you’re away!

4. Use the power of light. The battle against germs is a year-round endeavor. This spring, instead of repeating the old routine of a rag and some harsh cleaner, which often can spread more germs than it kills, try a UV sanitizing wand. These simple devices use a powerful ultraviolet light to kill odor-causing bacteria and germs on hard surfaces. It’s the same technology used in many hospitals and is perfect for bathrooms, kitchens, even cleaning your kids’ toys.

5. Let your appliances do more work. Have you ever wondered whether your oven, dishwasher and refrigerator could be doing a little more to reach their full potential? If so, you probably have yet to use the new generation of smart appliances. LG’s line of SmartThinQ appliances are Wi-Fi enabled, allowing you to monitor dishwashing and laundry cycles, remotely clean the oven or even check the air quality at home from your phone or computer while you are out of the house.

Far from being a chore, spring cleaning is a celebration, a chance to chase away the stuffiness of winter and bring a fresh, revitalizing feeling into your house. With the help of new technology, it’s even easier to get a start on this season of growth and regeneration.


Think spring: Now’s the time to plan the landscape of your dreams

2017-12-12T10:01:00

(BPT) – The weather outside is frightful, and the week ahead calls for falling temperatures, maybe even snow. That makes it easy to dream of warmer spring weather, but to plan for it? To sit and strategize for making the most of next year’s lawn and landscape projects? That seems like no small feat.

It doesn’t have to be.

The good news is that spring will be here before you know it, and now is the best time to work with your local landscape professional to set the stage for a healthy spring. With the expertise and knowledge of a professional, you’ll be well on your way to get a thriving landscape you’ll enjoy come spring.

Finding the right professional for you

Quality lawn care and landscape professionals are all around you, but finding the perfect one can be challenging if you go it alone. Instead, consult the National Association of Landscape Professionals (NALP) professional directory at www.loveyourlandscape.org/find-a-pro/. You’ll have access to the NALP’s comprehensive directory and can find inspiration through the organization’s expert advice columns and idea center, motivating you to take your spring landscaping projects to new heights.

Making the most of your relationship with your landscape professional

The initial conversations you have with your landscape professional are essential for creating a beautiful outdoor space. When working with a professional, you can become more prepared by considering the answers to these questions in advance of your first meeting.

* What’s important to you? You don’t need to know every last detail, but you should have a broad understanding of what you want. Do you want to entertain? Have space to garden or create a private area to enjoy quietly by yourself? Determining what you want your yard to be and how it will be used can help your landscape professional realize your vision.

* What’s your budget? When it comes to dreaming of the perfect landscape project, the limit is your imagination. But once you place some real-world practicality behind it, the limit will ultimately be your budget. So, how much are you willing to spend? It’s a good idea to have a rough estimate of this figure in your head before discussing plans with your landscape professional. Relaying this information to them will allow them to tailor a project that matches your expectations and your budget.

* What plants are best for your property? Flowers, shrubs and trees are all integral to any landscape project and you should have an idea of what you’d like to see. If you don’t know, visit your local greenhouse or nursery for inspiration and gain a greater understanding of native plants that fare well in your environment.

* What level of lawn care is needed? Whether or not you have sprawling acres of land, a healthy lawn of any size and shape sets the foundation for a beautiful landscape. Your lawn care professional can review with you how to grow and maintain a lawn through all the seasons. Consider if weed control, mowing, aeration, fertilization and irrigation may be needed as part of your lawn care program. A lawn care specialist can help you budget and plan for these tasks now, even if your lawn is covered in frost or snow!

It’s never too early to start planning

The long weeks of winter are here, but now is the perfect time to formalize your plans for a gorgeous, spring lawn and landscape. A professional can help you reach every goal you’ve dreamed about. So start planning today. Your home will benefit from your preparation — and on those cold mornings, it sure helps to dream of spring, doesn’t it?


Spring without the wings: 5 tips to avoid a seasonal pest problem

2018-01-25T15:19:00

(BPT) – Daydreaming of spring is something everyone does during the coldest days of winter — even pests. The promise of warmer weather on the horizon is also a boon for the numerous species of pests that inhabit your area, and when the temperature perks up, many of those pests come out of hiding and start looking towards your home for food and shelter.

Protecting your home and property from seasonal intruders is a year-long job, but your task could be simpler if proper preparations are made in advance of spring’s first bloom. To help you do just that, the National Pest Management Association (NPMA) offers these tips for keeping your property pest-free this year:

* Identify the threats. To start your pest prevention effectively, the first step is to know what to look for. The winter months saw an influx of furry critters trying to invade homes, but springtime pests are more often of the six-legged variety. Ants, flies, bees/hornets, ticks, mosquitoes and termites are all common nuisance pests during this season. Visit www.pestworld.org to learn more about what threats are most common in your area and how to identify them.

* Block the openings. Even the smallest pests are able to find a way into your home, and in many cases that way is through your windows. Keep windows shut during swarming periods for insects like ants or termites and install screens and door sweeps to keep winged intruders, like flies, mosquitoes and hornets, out.

* Make your yard less inviting. Don’t allow your yard to be a base of operations for future pest activity. Keeping your grass freshly cut makes the space less appealing to pests, and trimming trees and bushes near your home is a great way to prevent easy access for potential travelers. Lastly, and perhaps most importantly, you should also remove standing water from your property. Even an upside-down Frisbee can collect enough water to be a breeding ground for mosquitoes. Fill wet patches with dirt, if necessary, and tip over any cups, flower pots or bowls that collected water during the winter.

* Look for signs of activity. A pest infestation can’t stay hidden forever. Alive or dead insects in your home are a sign of a larger problem, as is damage to wood if you live in an area where termites are prevalent. Signs of a potential problem may exist outside, as well. Take a stroll around your home and check your roof for hornet nests. They will be small in the spring but will grow larger throughout the season if action isn’t taken.

* Contact the experts. If you’re looking for even more strategies to reduce the risk of pests infesting your home or you suspect your home has already succumbed to an infestation of some type, your local pest control professional can help you rid your home of existing threats and shore it up to prevent against new invaders. Visit www.pestworld.org to find a local exterminator in your area. It’s the easiest way to turn your spring pest problem from growing to gone.


A great lawn begins with a great engine

2018-01-31T13:01:00

(BPT) – As the days grow longer and the snow begins to recede, homeowners will once again venture outdoors to get their yards and lawn into tip-top shape for summer fun. But just like your lawn has been hibernating over the long winter, so too has your lawn mower and other small engines. Even if you properly winterized your mower, there are a few things you’ll need to do to ensure it works like it should. To get there, follow these five steps.

1. Freshen up with a new tank of gas. It only takes 30 days for the gasoline in your mower to start to break down, which can harm your engine. If you have any gas left in the tank from the fall, empty it with a siphon and fill the tank with fresh fuel straight from the gas station. For optimal results, use ethanol-free gas (E0).

2. Don’t forget to check the oil. A new season means new oil. This will ensure your motor will run smoothly and it will go a long way to prevent overheating. Be sure to check the owner’s manual to make sure you put in the right kind of oil and the proper amount.

3. Two components to clean and replace. Along with keeping your mower fed with fresh gas and oil, at the beginning of each season there are two components to either clean or replace: the spark plug and the air filter. To inspect the spark plug, simply clean the area around the cylinder and use a wrench to remove the plug. Check for any damage or black coating, and if the plug appears damaged, replace it. As far as the air filter goes, it’s best to start each season with a new one. Consult the owner’s manual for reference on how to do this and always consider using genuine parts from the manufacturer.

4. Sharpen the blade. A dull lawnmower blade rips and tears blades of grass in your lawn, making them more prone to disease and discoloration. A sharp blade helps promote a greener, fuller and healthier lawn. Most local hardware stores or small-engine shops offer blade-sharpening services.

5. Maybe you need a new engine? If you’ve gone through all the maintenance tips above and you’re still having problems with your mower, it’s probably time for a new one. When making a purchasing decision, focus on the most essential component: the engine. Ideally, you want an engine that offers minimal maintenance, easy starting and smooth, effective operation. The Kohler 5400 Series is a new option featuring a Triple-Balance System, which significantly reduces vibration for a more comfortable ride.

To learn more about how the right engine can improve the performance of your mower, visit www.KohlerEngines.com.


Deliver curb appeal with a DIY block mailbox

2018-01-31T13:43:00

(BPT) – We’ve all heard the old adage, “you only get one chance to make a first impression.” Well, that statement holds true when you’re talking about a home. Whether it’s the landscaping, the siding, the front door, the windows, the paint, the driveway or the outdoor furniture, the initial reaction to the exterior appearance of a home is permanent. Quite literally, the curb appeal of your home can influence the experience of visiting guests. In addition, 63 percent of homebuyers will visit a home they like after viewing it online, according to the National Association of Realtors. So, investing the time, energy and money to maximize the curb appeal of your home makes a lot of sense. Unfortunately, an important element of curb appeal that is often overlooked is the mailbox.

There are more than 50 million curbside mailboxes in the U.S. While these mailboxes serve an important daily function, they also set the tone for a home’s curb appeal. Rather than feature a mailbox on a plain wooden or metal post, placing one in a brick, stone or block enclosure is a popular alternative that can be done without hiring a contractor or being a skilled mason. Building an attractive mailbox column is a DIY project any homeowner can now handle using a versatile block system like Stonegate Country Manor from Keystone Hardscapes.

Note: Wearing gloves and eye protection is recommended.

Steps for building a block mailbox column:

* Mark off the mailbox footprint with paint and remove the dirt from inside until the hole is 12 inches deep. Level the bottom with a hand tamper.

* Add 6 inches of crushed stone a few inches at a time and compact with a hand tamper.

* Install the first course by centering the blocks inside the mailbox footprint and place 6 inches below finished grade. Check front to back and side to side with a level and adjust as necessary with sand and a hammer.

* Lay the second course of block on top of the first course of block in an alternating pattern to make sure they fit correctly. Remove the blocks and apply two quarter-inch-wide strips of QUIKRETE Polyurethane Construction Adhesive on each block in the first course approximately 3 inches away from the inside and outside edge before attaching the second course.

* Repeat the process until you complete the column, being sure to alternate the course layouts as indicated by the directions. Be sure to use a level on each course.

* Once the seventh course is completed, fill the core with the remaining crushed stone so the mailbox has a location to rest. Build the mailbox layer by placing the first course of blocks and securing with concrete adhesive as indicated by the directions.

* Use spray foam to seal behind the face of the mailbox and use QUIKRETE Non-Shrink Grout to fill around the mailbox so that it’s flush and the door opens and closes freely.

* Install the second mailbox course and secure with concrete adhesive before filling around the mailbox again with grout.

* Finally, secure the mailbox in place with concrete adhesive before installing a cap of your choice.

There are a variety of block mailbox column styles, colors and sizes to match the look of any home. In addition, you can easily update your front or back yard with fireplaces, fire pits, kitchens, benches and retaining walls by downloading block system project designs and step-by-step instructions like Stonegate Country Manor at www.KeystoneHardscapes.com.