5 questions to ask when shopping for a mortgage

2018-04-26T12:01:00

(BPT) – Buying a home is a major financial commitment. It’s exciting, but can also be confusing and overwhelming. Choosing the best mortgage that fits your needs is an important first step and first-time homebuyers in particular should research the many options and know the right questions to ask. Here are some questions to ask a lender that will help you make an informed mortgage decision:

* How much can I afford? A home affordability calculator can help you get an idea of what you may be able to afford and keep your monthly payments within your budget. In addition to recurring expenses like car payments, student loans, credit cards and disposable income, be sure to consider other monthly expenses related to the new home, like association fees, homeowners’ insurance, utilities and property taxes. Further, some types of mortgages have firm eligibility cutoffs related to the ratio between a buyer’s total debt amounts and their monthly income.

* How much do I need for a down payment? It’s a common misconception that a 20 percent down payment is required to buy a home. Let’s face it, a 20 percent down payment is a lot of money, and often the largest obstacle for homeownership, especially for first-time buyers. You can qualify for a conventional mortgage with as little as 3 percent down. Conventional mortgages originated with a low down payment, which is defined as less than 20 percent, require private mortgage insurance (MI) until approximately 20 percent equity is established through either monthly payments or home price appreciation. When mortgage insurance cancels, your monthly mortgage bill is reduced. It is important to know that not all forms of MI are created equal — private mortgage insurance is temporary and cancelable but the overwhelming majority of mortgages backed by the government’s Federal Housing Administration (FHA) contain insurance that cannot be canceled.

* What is the interest rate and is it fixed? Most first-time homebuyers go with a 30-year fixed-rate mortgage, which locks you into an interest rate with steady, predictable payments. Different lenders may offer different rates, so make sure to contact several lenders to ensure you’re getting the best option available in the market. A rate lock protects you from rising interest rates while the loan is being processed and lasts for a specific amount of time. In addition, make sure you know whether the rate is fixed or “adjustable.” Adjustable rate mortgages, commonly referred to as “ARMs,” result in periodic adjustments in the interest rate based on the lender’s cost of credit, and can be detrimental to homeowners in rising interest rate environments. Finally, ask if you are paying for “points” to reduce the interest rate. It’s an added upfront cost paid at closing, but it results in a lower rate for the life of the loan.

* Does my credit score matter? Yes, generally stronger credit scores (FICO 720 and above) come with better interest rates, but fortunately there are mortgage options for those with imperfect credit scores too. When you apply for a mortgage, your credit record is used to help determine your approval and mortgage terms, but it is not the only thing lenders consider. A lender will also look at your debt-to-income (DTI) ratio, cash reserves and other factors to help gauge your overall creditworthiness.

* Should I get pre-approved for a mortgage? Yes. Pre-approval means you receive a conditional commitment from a lender up to a specific loan amount. In a seller’s market with tight housing supply, being pre-approved demonstrates that you are a serious buyer with access to mortgage financing. To become pre-approved, you’ll provide your lender with information on your income, assets, debts and credit history to analyze your financial profile and determine your creditworthiness and amount you can borrow to purchase a home.

Make sure to know your options and choose the one that works for you. Check out lowdownpaymentfacts.org to learn more.


Grow your own flowers and vegetables this summer with this easy DIY garden bed project

2018-04-26T10:01:00

(BPT) – When it comes to DIY, some projects are about function, others about flair. And then there are those projects that do it all, like the perfect raised garden bed. Whether you want to get back to nature or add a signature piece to your outdoor space, this project delivers. Plus, it’s easy to do yourself, saving you time and money so you can focus on enjoying the season.

Adding this attention grabber to your outdoor space is easier than you think. Use these instructions to build a 4-foot-by-4-foot-by-2-foot bed and get ready for the planting season. Remember, the directions can be altered to a size that better fits your garden.

1. Assemble your materials

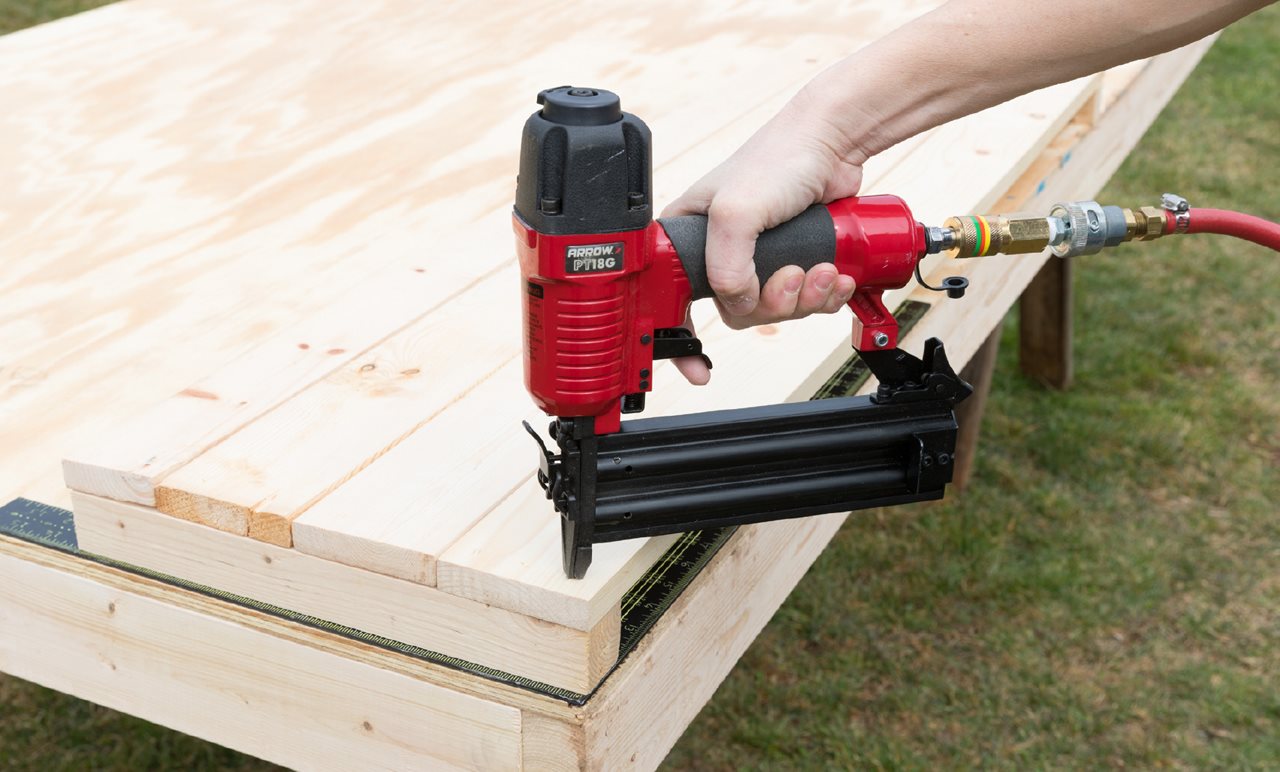
The right tools make any job so much easier, so before you start your project make sure you have everything you need. For this project you will need a T50 Heavy Duty Staple Gun, a PT18G Pneumatic Brad Nailer, Arrow T50 Staples and some Arrow Brad Nails. You’ll also need a few other pieces you can find here.

2. Building the base

Place the square on a corner of your work table. Set two corner posts on the table with one on the square. Next, place four bed sides on top of the two corner posts and align them with the edge of the square. Use the Arrow PT18G Pneumatic Brad Nailer and 2-inch Arrow Brad Nails to secure the bed sides to the corner posts. Repeat the process one more time.

3. Secure the sides

Now place one assembled side upright on the table. Secure the next four bed sides, one by one, starting at the bottom with brad nails. Repeat on the opposite side of the assembled piece with four more bed sides. Take the remaining assembled side and secure it with brad nails to complete the four sides of the garden bed.

4. Applying the mesh

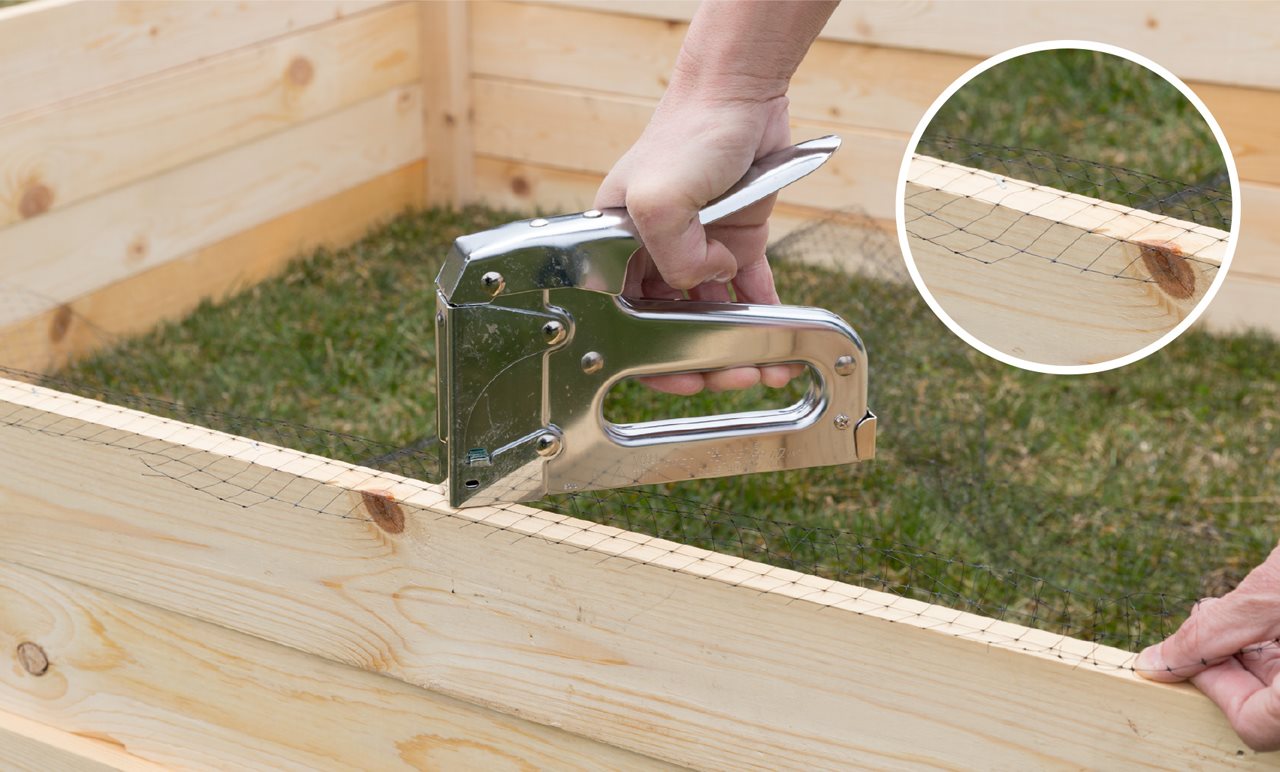
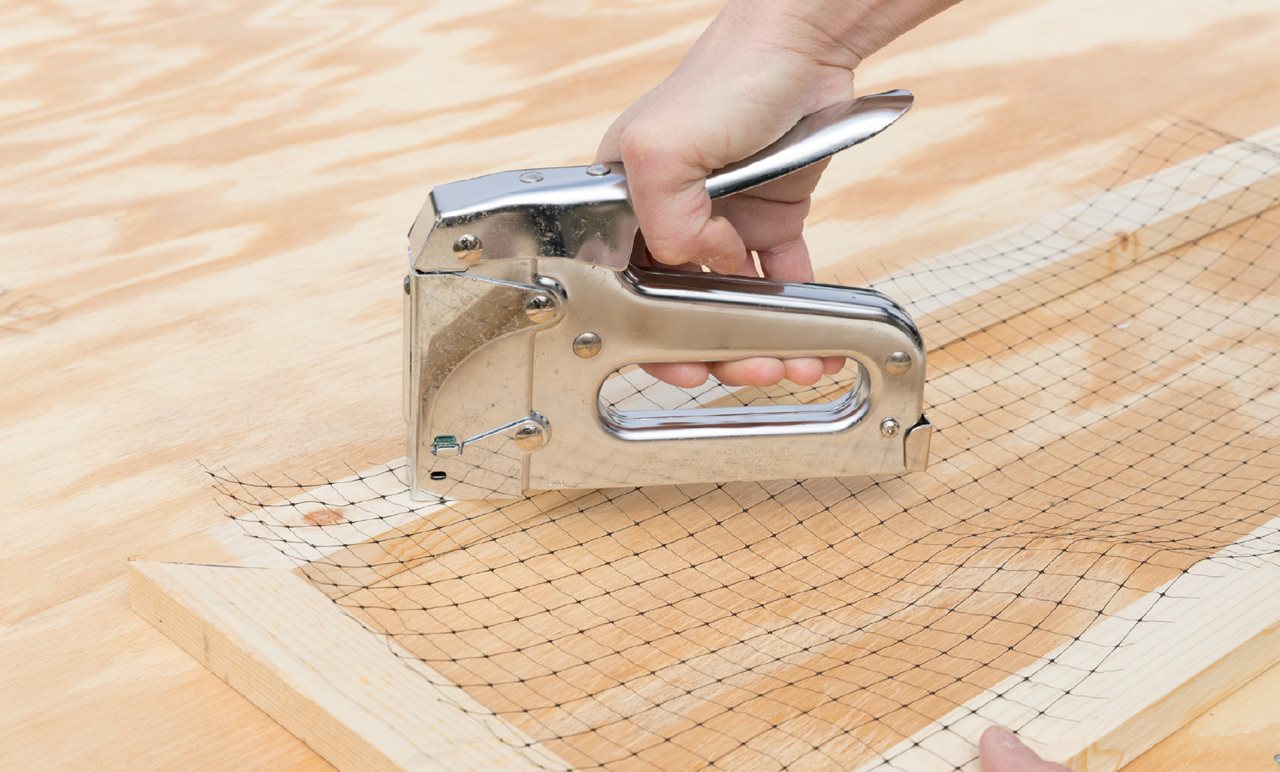
Place the garden bed on its side. Use the Arrow T50 Staple Gun and Arrow T50 504M1 1/4-inch staples to attach the 5-foot-by-5-foot mesh to the bottom of the bed. This mesh will allow earthworms to get in and help keep the weeds out. Use scissors to trim the excess mesh. The 504M1 staples are rustproof and rated for outdoor use.

5. Finishing the bed walls

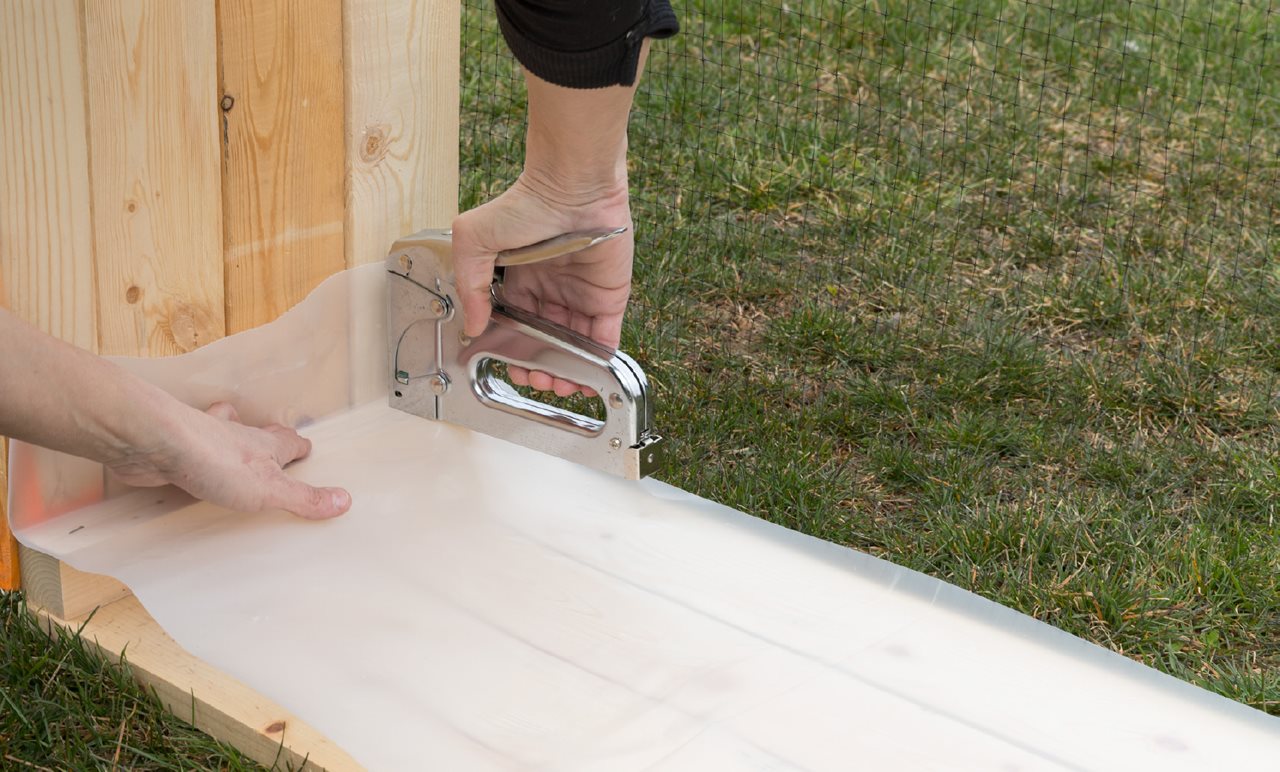
Next, staple the plastic to the inside of the bed walls. Raised garden beds last a little longer with this plastic in place.

6. Fortify the fence frames

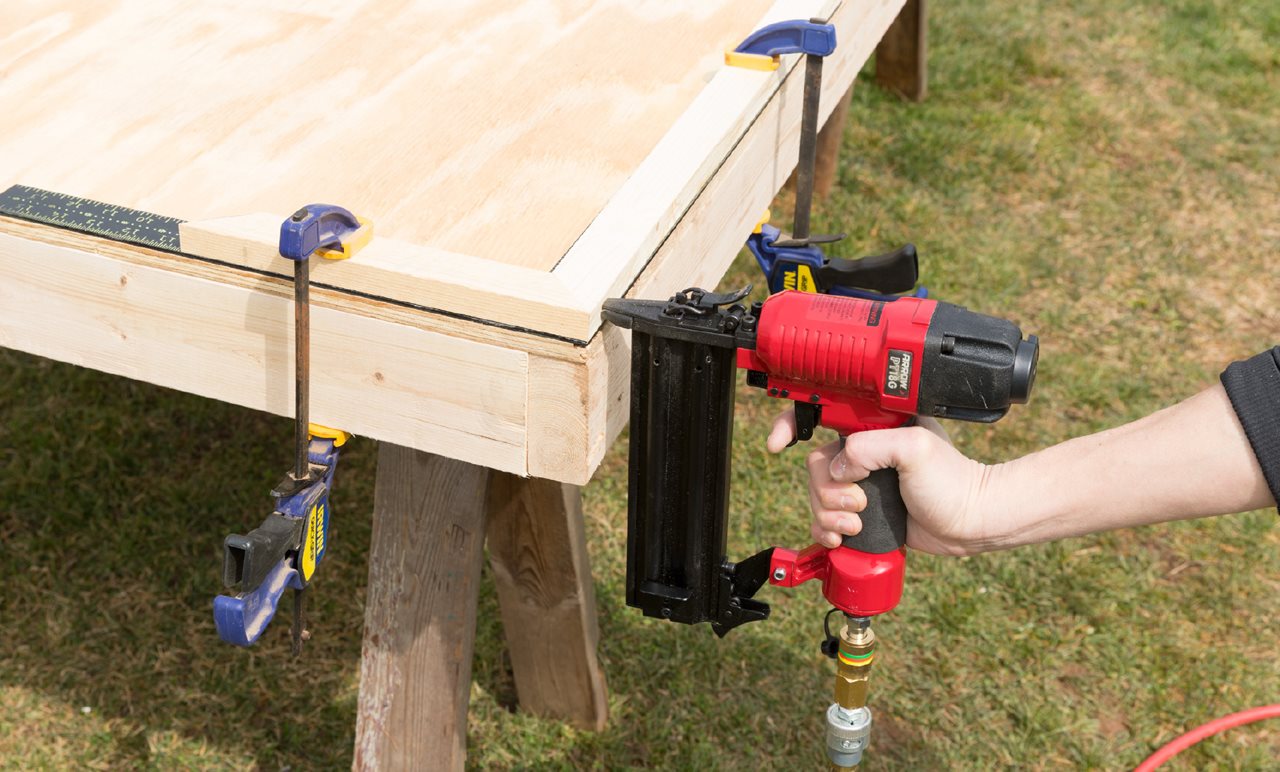
Now build the fence frames with the Arrow PT18G Pneumatic Brad Nailer and 2-inch Arrow Brad Nails. Use the clamps and the square in this step as pictured. When built, there should be two frames measuring 10 inches by 48 inches and two frames measuring 10 inches by 49 1/2 inches.

7. Add larger mesh sections

Next, attach a 12-inch-by-50-inch piece of mesh to one side of the frame with staples. Repeat this step three more times and trim any excess mesh with scissors.

8. Hook up the hinges

Place the raised garden bed on a table and measure each side of the bed at 12 inches for hinge placement. Secure the hinge with a drill, continuing on all four sides of the garden bed.

9. Finishing the frame

Set a smaller fence frame on the top of the garden bed and attach it to the hinge. Repeat this process on the opposite side of the garden bed as well. Take the longer fence frame and attach it to the hinge, continuing on the opposite side.

10. Linear latches

Line up the latches as pictured, attaching them with a drill, two on each side of the garden bed. These latches will allow you easy access to your plants.

11. Enjoy your new garden bed

The garden bed is now ready to use. Fill with soil and plant your favorite flowers or vegetables.


3 communities thriving thanks to unconventional partnerships

2018-04-26T09:01:00

(BPT) – What helps a community thrive? It’s a question with answers as variable as the people responding. Some might say that healthy communities are safe communities. To others, flourishing communities experience significant economic growth and stability. Still others would insist a thriving community may simply be one where people work together to support goals for the betterment of everyone.

As demonstrated through extensive research by the Thriving Cities project, the strongest communities across the nation exhibit several of these qualities but they also have the ability to assemble unconventional coalitions to serve their residents. One of the brightest examples of this philosophy is when businesses and entrepreneurs partner with educators to create programs that support the common good.

So where is this taking place? Here are three examples of communities where such innovations are occurring right now.

The Hilltop Artists

“Using glass arts to connect young people from diverse cultural and economic backgrounds to better futures” is the mantra of this Tacoma, Washington-based art school. Founded by Dale Chihuly and Kathy Kaperick in 1994 and through support from The M.J. Murdock Charitable Trust, Hilltop Artists partners with several schools in the Tacoma School District to provide students an alternative to violence and delinquency through the creation of glass art made while working together. In addition to an artistic education, students also gain business knowledge as they help market and sell commissioned pieces.

The efforts are paying off, as over the last four years, Team Production students have posted a perfect 100 percent graduation rate and 58 percent have gone on to pursue post-secondary education. Some of them likely doing so in art.

Garden City Harvest

Based in Missoula, Montana, Garden City Harvest grows sustainable produce for members of the local community in need. Through a partnership between companies like Missoula Federal Credit Union, educators including Willard Alternative High School, the University of Montana and organizations such as Missoula Youth Drug Court and the Human Resources Council, at-risk teenagers can gain on-the-job training through the Youth Farm employment program. The project also helps them to build confidence, leadership skills and a strong work ethic through the produce they grow.

In addition to benefiting the students who take part in the program, Garden City Harvest supports those in need throughout the Missoula area. Today more than 90 percent of produce consumed in Montana is shipped from out of state and 20 percent of Missoulans live in poverty. The efforts of Garden City Harvest are working to change those numbers on both fronts.

Zambia Gold

Launched by Gonzaga University, Zambia Gold utilizes a team of interns to collaborate with farmers in Zambia to import honey for sale in the U.S. Supported through the university and nonprofit foundations like The M.J. Murdock Charitable Trust, Zambia Gold does more than just give the people of Zambia an economic outlet. It also boosts educational opportunities in the country by filling Zambia’s Chilena Basic School library with more than 20,000 books over the last eight years while offering valuable training in business and service to the Washington-based interns. This makes for a partnership that is economically, educationally, and, of course, deliciously beneficial all around.

Improvements in your own community

The examples above are just three ways in which organizations and educators have come together to make meaningful community changes in an unconventional way. Now, what can you do in your own community to create a unique change for the common good? What can you do to make your already great community even better?

For inspiration and to learn more about the ways the M.J. Murdock Charitable Trust supports educational partnerships such as these, visit Murdocktrust.org/education.


Love dairy but it doesn’t love you? Tips for going dairy-free

2018-04-26T08:49:00

(BPT) – Do you love dairy, but usually regret eating it shortly after it’s gone? That sour stomach after drinking milk, munching on cheese or eating ice cream is sometimes called a dairy hangover. The culprit: lactose.

Lactose is a milk sugar. Infants have special enzymes that break down lactose. As people grow, the ability to digest milk typically decreases because they lose these enzymes. In fact, approximately 65 percent of the human population has a reduced ability to digest milk and foods made with milk after infancy, according to the National Institutes of Health.

Symptoms of lactose intolerance

If you’ve had the following symptoms after eating dairy products, you may be lactose intolerant:

* Gas

* Bloating

* Abdominal cramping

* Diarrhea

* Nausea

If you or your children have these symptoms, there are many things you can do. First, talk with your doctor or nutritionist about your health concerns. Second, consider keeping a food journal of what you eat and how it makes you feel. This can help uncover trends and important connections. Finally, research high-quality dairy-free alternatives for you and your family’s diet.

Tips for going dairy-free

Adjusting to a low-dairy or dairy-free diet might seem overwhelming. There are many dairy-free milk options on the market, but it’s important to be a conscientious shopper. Whereas most dairy-free beverages use non-food flavorings and additives like carrageenan, all plant-based Mooala products are made with real ingredients, and are USDA-certified organic, Kosher and GMO-free.

Another concern for people cutting dairy is vitamin D and calcium deficiencies. Fortunately, there are foods you can add to your diet so you get these important nutrients. Egg yolks, canned tuna and almonds are good sources of vitamin D. Spinach, kale, collards and white beans are good sources of calcium. What’s more, many common grocery store items are fortified with calcium and vitamin D, such as breakfast cereals and orange juice. Just look at the label for more information.

There are plentiful options to eat well and go dairy-free if you have lactose sensitivities. Have fun exploring new recipes that support your nutritional needs. One that features many of these powerful dairy-free foods is a tasty smoothie you can whip up in just minutes:

Grapefruit Bananamilk Smoothie

Ingredients:
1 deseeded grapefruit
1 sweet apple
2 handfuls of spinach
1 frozen banana
1 handful of ice
1/2 cup Mooala’s Original Bananamilk
Dash of fresh ginger

Directions:
Place ingredients in blender, then puree until you’ve reached your desired consistency.


More life-threatening allergy incidences in infants and toddlers: How parents can be prepared

2018-04-26T07:01:00

(BPT) – Parenting during the early years of childhood can be an exciting experience — first steps, first words and other milestone “firsts” — but there are other firsts too — first fever, first cold, and increasingly for parents — first allergic reaction. No parent ever wants to be unprepared if their infant or toddler experiences an allergic reaction, which could be an anaphylactic event.

Anaphylaxis is a severe, potentially fatal allergic reaction that occurs as a result of exposure to allergens. Common allergens include food, insect stings and bites, medication and latex.1,2 To learn more about life-threatening allergies, visit www.auvi-q.com/resources.

Infants and toddlers are increasingly being treated for anaphylaxis. In a study of more than 56,000 emergency department visits for anaphylaxis in the United States from 2005 to 2014, the overall increase in the rate of visits for children aged 0 to 4 years was almost 130%.3 There are several measures that parents can take to be prepared in the event their infant or toddler experiences an allergic emergency.

Ask about a new treatment option for your infant or toddler

For those with life-threatening food allergies, there are epinephrine auto-injectors (EAIs) that will treat an anaphylactic reaction, but until now, there was no EAI specifically designed for infants and toddlers weighing 16.5 to 33 pounds (7.5 to 15 kilograms). Who needs an EAI? How do you know if your little one might be at risk for a life-threatening allergic reaction? Speak to your doctor about the AUVI-q® (epinephrine injection, USP) 0.1 mg, the first and only EAI specifically designed for the treatment of life-threatening allergic reactions, including anaphylaxis, in infants and small children weighing 16.5 to 33 pounds (7.5 to 15 kilograms). Only AUVI-q 0.1 mg has a dose and needle length designed specifically for treating anaphylaxis in this young patient population. Like the currently available AUVI-Q 0.15 mg for children weighing between 33 and 66 pounds, and AUVI-Q 0.3 mg for anyone who weighs 66 pounds or more, AUVI-q 0.1 mg is about the size of a credit card and has the thickness of a cell phone. It also includes the innovative AUVI-Q electronic voice instruction system as well as visual cues to help guide users step-by-step through the administration. AUVI-Q is for immediate self (or caregiver) administration and does not take the place of emergency medical care.

Ask your doctor about new guidelines on preventing peanut allergies

A study published in 2015 looked at infants at high-risk for developing peanut allergy. In those infants, results showed an 81 percent lower likelihood that peanut allergy would ultimately develop if peanuts were regularly consumed early in life. This evidence led the National Institutes of Health (NIH) to update its allergy prevention guidelines, which now recommends that parents introduce peanut-containing foods to infants considered to be at high-risk of developing peanut allergy as early as the first four to six months of life to help reduce their chances of developing an allergic reaction at an older age. 4

Know how to identify an infant or toddler having an anaphylactic emergency

Infants may not be able to verbalize their symptoms to explain how they are feeling, making it extra important to be cognizant of physical symptoms.5 Many signs and symptoms of anaphylaxis in infants are subtle and may be mistaken as signs of normal development or other illnesses in infants. Examples include irritability, clinginess, inconsolable crying, drowsiness, drooling and regurgitation.6 The most common symptoms of anaphylaxis are hives, nausea/vomiting and swelling for infants under the age of 2, and hives, swelling and wheezing for young children aged 2-5.7

Watching your infant or small child experience a life-threatening allergic reaction is scary. Taking precautionary measures to prevent food allergies and actions to be prepared if an allergic event occurs is important.

Indication

AUVI-Q® (epinephrine injection, USP) is a prescription medicine used to treat life-threatening allergic reactions, including anaphylaxis, in people who are at risk for or have a history of serious allergic reactions.

Important Safety Information

AUVI-Q is for immediate self (or caregiver) administration and does not take the place of emergency medical care. Seek immediate medical treatment after using AUVI-Q. Each AUVI-Q contains a single dose of epinephrine. AUVI-Q should only be injected into your outer thigh, through clothing if necessary. If you inject a young child or infant with AUVI-Q, hold their leg firmly in place before and during the injection to prevent injuries. Do not inject AUVI-Q into any other part of your body, such as into veins, buttocks, fingers, toes, hands, or feet. If this occurs, seek immediate medical treatment and make sure to inform the healthcare provider of the location of the accidental injection. Only a healthcare provider should give additional doses of epinephrine if more than two doses are necessary for a single allergic emergency.

Rarely, patients who use AUVI-Q may develop infections at the injection site within a few days of an injection. Some of these infections can be serious. Call your healthcare provider right away if you have any of the following symptoms at an injection site: redness that does not go away, swelling, tenderness, or the area feels warm to the touch.

If you have certain medical conditions, or take certain medicines, your condition may get worse or you may have more or longer lasting side effects when you use AUVI-Q. Be sure to tell your healthcare provider about all the medicines you take, especially medicines for asthma. Also tell your healthcare provider about all of your medical conditions, especially if you have asthma, a history of depression, thyroid problems, Parkinson’s disease, diabetes, heart problems or high blood pressure, have any other medical conditions, are pregnant or plan to become pregnant, or are breastfeeding or plan to breastfeed. Epinephrine should be used with caution if you have heart disease or are taking certain medicines that can cause heart-related (cardiac) symptoms.

Common side effects include fast, irregular or ‘pounding’ heartbeat, sweating, shakiness, headache, paleness, feelings of over excitement, nervousness, or anxiety, weakness, dizziness, nausea and vomiting, or breathing problems. These side effects usually go away quickly, especially if you rest. Tell your healthcare provider if you have any side effect that bothers you or that does not go away.

Please see the full Prescribing Information and the Patient Information at www.auvi-q.com.

You are encouraged to report negative side effects of prescription drugs to the FDA. Visit www.fda.gov/medwatch or call 1-800-FDA-1088.

1 Lieberman P, Nicklas RA, Randolph C, et al. Anaphylaxis—a practice parameter update 2015. Ann Allergy Asthma Immunol. 2015;115(5):341-384.

2 Kelly KJ, Viswanath PK, Reijula KE, Fink JN. The diagnosis of natural rubber latex allergy. J Allergy Clin Immunol. 1994; 93(5):813-816.

3 Motosue, M. et al. Increasing ED visits for anaphylaxis 2005-2014 The Journal of Allergy and Clinical Immunology: In Practice (2017) 5:1, 171-175

4 National Institute of Health, National Institute of Allergy and Infectious Diseases. Addendum Guidelines for the Prevention of Peanut Allergy in the United States. Retrieved from https://www.niaid.nih.gov/sites/default/files/peanut-allergy-prevention-guidelines-clinician-summary.pdf.

5 Dosanjh, A. (2013). Infant anaphylaxis: the importance of early recognition. Journal of Asthma and Allergy, 6, 103–107. DOI: 10.2147/JAA.S42694.

6 Simons, F.E.R. (2007). Anaphylaxis in infants: Can recognition and management be improved? J Allergy

Clin Immunol Pract 120, 537-540. DOI: 10.1016/j.jaci.2007.06.025

7 Rudders, S.A., Banerji, A., Clark, S., Camargo, C.A. (2011). Age-related differences in the clinical presentation of food-induced anaphylaxis. J Pediatr., 158, 326e328. DOI: 10.1016/j. jpeds.2010.10.017.


When a headache isn’t just a headache: 5 things you may not know about migraine

2018-04-20T12:00:00

(BPT) – Most of us have a friend or loved one who suffers from migraine — recurrent, pulsing headaches that typically attack one side of the head but may occur on both sides and may cause visual disturbances, nausea and vomiting. However, many are unaware of the debilitating impact of migraine on patients and the healthcare system. Here are five facts you may not know about migraines.

1. Migraine is the third most prevalent illness in the world[1]

Even more prevalent than diabetes, epilepsy and asthma combined, the World Health Organization (WHO) estimates the current worldwide prevalence of migraine to be 10 percent and a lifetime prevalence of 14 percent.[2] In the U.S., migraine affects approximately 39 million people, and an estimated 100,000 migraines occur every day.[3][4] Nearly one in four U.S. households includes someone with migraine.[5]

2. Migraine is the sixth most disabling illness in the world[3]

WHO classifies individuals suffering from migraine the same as those with quadriplegia, in terms of debilitation.

3. In the U.S., headache leads to more than 150 million lost workdays annually and is a strain on the healthcare system[6]

More than 90 percent of migraine sufferers are unable to work or function normally during their migraine.[3] Research shows that 60 percent of adult patients who were diagnosed with primary headache, including migraine, had one or more comorbidities, which raised the average annual cost of their healthcare to four times that of a healthy patient.[7]

4. Even with proper diagnosis, migraine treatment can be frustrating.

The cause of migraine attacks is still not fully understood, causing it to be a difficult disease to treat. While several hundred medications, devices and surgical options are used to treat and prevent migraine attacks and symptoms, few have been developed specifically for migraine.[8]

5. There is no cure for migraine[1]

The current goal of migraine treatment is prevention and reduction of pain. One advancement in the treatment of migraine is the use of neuromodulation devices. electroCore, a bioelectronic medicine healthcare company, is dedicated to improving patient outcomes by focusing on non-invasive vagus nerve stimulation therapy for the treatment of primary headache. For more information, please visit http://www.electrocore.com/.


[1] Learn more about migraine. American Migraine Foundation. https://americanmigrainefoundation.org/learn-more/. Accessed on January 4, 2018.

[2] Facts and figures. Migraine Trust. https://www.migrainetrust.org/about-migraine/migraine-what-is-it/facts-figures/. Accessed on January 4, 2018.

[3] Migraine facts. Migraine Research Foundation. http://migraineresearchfoundation.org/about-migraine/migraine-facts. Accessed on January 4, 2018.

[4] Global burden of migraine in the Year 2000: summary of methods and data sources. World Health Organization. http://www.who.int/healthinfo/statistics/bod_migraine.pdf. Accessed January 2018.

[5] Matharu, MS; Goadsby, PJ (September 2004). “Cluster headache: focus on emerging therapies.” Expert Review of Neurotherapeutics.

[6] Migraine statistics. World Health Organization. http://www.who.int/healthinfo/statistics/bod_migraine.pdf. Accessed on January 4, 2018.

[7] GNS Healthcare Research presented at the Academy of Managed Care Pharmacy (AMCP) Nexus in October 2016.

[8] Migraine treatment. Migraine Research Foundation. http://migraineresearchfoundation.org/about-migraine/migraine-treatment/. Accessed on January 8, 2018.

[4]Global burden of migraine in the Year 2000: summary of methods and data sources. World Health Organization. http://www.who.int/healthinfo/statistics/bod_migraine.pdf. Accessed January 2018.


How your lawn equipment is harming the environment

2018-04-25T14:01:00

(BPT) – Spring is upon us and our yards are beginning to bloom. The grass needs to be cut, the hedges trimmed and the debris blown away. This is an exciting time of year as we all look forward to getting outdoors after a longer than desired winter season.

As we begin our list of warm-weather chores, is it possible that our lawn equipment is actually harming the environment? Unfortunately, the answer could be yes, depending on the type of equipment you’re using to keep your lawn in tip-top shape. If you’re still using gas-powered outdoor gear, here are some important facts that you should know, according to Ted Steinberg’s American Green:

* A gas-powered walk-behind mower running for one hour emits as much pollution as eight cars operating for the same period of time.

* A riding lawn mower emits as much pollution as 34 cars operating for the same period of time.

* In the U.S. alone, 17 million gallons of fuel are spilled into the ground every year during the refueling of lawn and garden equipment.

Now that you know some of these shocking statistics, what can you do to make a difference?

Fortunately, thanks to advancements in technology, there are now viable alternatives to gas-powered lawn equipment. Battery-powered outdoor gear delivers the same power and run-time of equivalent gas equipment, and battery-powered options completely eliminate harmful emissions. Importantly, battery-powered gear doesn’t require the mixing and pouring of gasoline, and is quieter, lighter and easier to use than gas models.

The good news is that people are making the change from gas to battery-powered equipment. For the first time in 2017, more battery-powered leaf blowers were sold than gas models, according to TraQline. Hopefully, with your help, that trend will continue to grow across all product categories in the future. For more information on battery-powered tools and how you can make a difference when working on your lawn, visit greenworkstools.com.


Rooftop decks for every style

2018-04-25T14:01:00

(BPT) – Fresh air, great views and capitalizing on unused space — it’s no wonder rooftop decks are a hot trend for suburban homes and urban apartment complexes alike.

Once reserved for the urban elite, rooftop decks are popping up all over the country as an attractive option that offers a mixture of space savings and an unrivaled view. The magic of rooftop decks is they take advantage of what was formerly unused space — the top of a building or the flat roof over part of a home — and reclaim it for a unique entertaining area or a family gathering spot.

“Especially when we’re working in cities, rooftop decks are essentially reclaiming space for a family that probably wouldn’t have any outdoor space otherwise,” said James Muckinhaupt, a senior builder/project manager for Mosaic Outdoor Living, a high-end custom deck builder in Colorado.

All that newfound space can present a challenge to designers and the homeowners they serve as they try to define the space to make the most of the rooftop deck’s open layout.

“If designers don’t really delineate the space well, we’ve found the decks end up being a giant space that’s never fully utilized by the homeowner,” James said.

James and his wife, Mary, a custom furniture consultant, offer some advice on how to turn your rooftop deck into a personal oasis and get the most out of the space.

1. Define the use

Mary said defining how the deck will be used the majority of the time is the top way to make sure the space fits the homeowners’ needs. Questions like, “Will the deck host weekly family dinner?” and “Will you use it daily for drinks and lounging?” help determine whether a kitchen/dining area is needed and how much seating should be included.

“It’s also important to know the average number of people they expect to fit on the deck,” Mary said. “If we don’t furnish and set the deck up so it’s conducive to their needs, we’ve found that people don’t use the deck.”

2. Stay true to your style

Most people have a style or color scheme they are already drawn to. A good designer will pay attention to the rest of a homeowner’s space and incorporate that theme into the rooftop deck to create a cohesive style from interior to exterior.

3. Focus on materials

Materials have a huge impact on the final look of the deck, whether it’s sleek tile, decorative concrete or luxury composite lumber. James said his rooftop decks are primarily Envision(R) composite lumber by TAMKO, because of the wide variety of styles the boards can accommodate, taking on everything from the look of exotic hardwoods to distressed reclaimed barn wood.

4. Add a covering

Regardless of how the deck will be used, it’s nice to have a covered area to escape the heat of the sun or the rain. Depending on the homeowners’ needs and budget, the covering can be anything from a grouping of large umbrellas to a covered structure with glass walls.

5. Include a fire element

If adding a covering helps extend deck season through the extreme heat of summer and the rain of spring, including a fire element extends the deck’s use through the fall and winter. This could be something as simple as a fire pit or as elaborate as a built-in fireplace.

“Between a shade covering and a fireplace, you’re extending deck season to 70-80 percent of the year, depending on where you live,” James said.

6. Work with the views

In the process of deciding where to add a covering and how to position furniture on a rooftop deck, consider the natural views. One area of the deck may offer superior views, either of nature or of a cityscape. Position furniture to open up to the best view and construct deck coverings and any needed walls, to obstruct any undesirable views.

“The view is one of the best things about a rooftop deck, so we want to focus the seating around whatever is the best view,” Mary said. “If there are great views on multiple sides, we’ll recommend using swivel chairs to give people the best of both.”


4 easy projects to turn trash into treasure

2018-04-25T13:23:00

(BPT) – Crafting is a great way to relieve stress and express your creative side — and fortunately, you don’t have to be a master craftsman — or spend a fortune on materials — to have fun and enjoy the benefits.

“A great way to get into crafting is by ‘upcycling’ — bringing new life into items you already have,” said Dinah Wulf, author and blogger of the website DIY Inspired. “Some of my favorite projects can be done with ordinary household items and just a dab of glue.”

Here are four easy “upcycled” projects to get your creative juices flowing.

A cork cell phone stand? Wine-not?!

Wine corks make excellent crafting material, so instead of throwing the cork away once the bottle is empty, put them to use by creating a stand for your smartphone. All that’s needed for this cute project is 24 corks and a sturdy, quick-drying glue like DAP RapidFuse All Purpose Adhesive.

Start by stacking the corks in a pyramid shape, applying just a thin layer of the glue to where the corks meet. Press each bond together for 30 seconds to ensure a strong hold. Next, just add one extra row of corks at the bottom for the phone to rest on, and repeat with the adhesive. Allow to cure for 30 minutes. In less than five minutes, you’ve created a unique resting place for your phone that keeps it handy while you work at your desk or look up recipes in the kitchen.

A dazzling jewelry box for hidden treasures

For an easy, budget-friendly crafting project, Dinah recommends scouring flea markets and garage sales for old ceramic boxes. With a little dressing up, they make the perfect jewelry box for you or a young one. Start by spray-painting the box in your desired color. Once dry, embellish with rhinestones or old figurines — even old decorative salt or pepper shakers. Simply dab a bit of adhesive on the item, then press into the box for 30 seconds to seal. It’s the perfect gift for the little princess in your life.

A bird feeder to tweet about

One of Dinah’s favorite projects is creating an eye-catching bird feeder made from an old saucer and teacup. It’s a great way to repurpose old dishes that you no longer use, while also bringing some whimsy to the backyard. Simply lay the cup on its side on top of the saucer, and check to see where the cup and saucer touch. Next, apply the adhesive to these two areas to set and press together for 30 seconds. To keep the cup from rolling as it sets, place two small items on either side. After it cures for 30 minutes, it will be ready to fill with bird seed and hang.

A marvelous mug makeover

We all have that favorite mug for our morning coffee, but with heavy use, it’s easy for the handle to chip or break in two. Instead of throwing it away, apply a bit of adhesive to the exposed ends and press together for 30 seconds. Your favorite mug is as good as new! Don’t have a favorite mug? Apply word tiles or other fun accessories to a basic ceramic mug to create a one-of-a-kind treasure that you’ll look forward to using each morning. Just be sure to apply adhesive only to the exterior of the mug, as many glues are not food safe, and hand wash your newly created masterpiece.

Beyond crafting for fun, use your new-found crafting skills to repair other household items such as flower pots and picture frames. Your first instinct may be to trash the pieces and shop for replacements, but by vowing to repair your items instead of replacing, you can save significant amounts of money, as well as hang on to irreplaceable heirlooms and items with sentimental value. RapidFuse All Purpose Adhesive is a cost-efficient solution, as it bonds to virtually everything, sets in 30 seconds and fully cures in 30 minutes. In less time than it takes to find a replacement, you can be enjoying your old items once again.