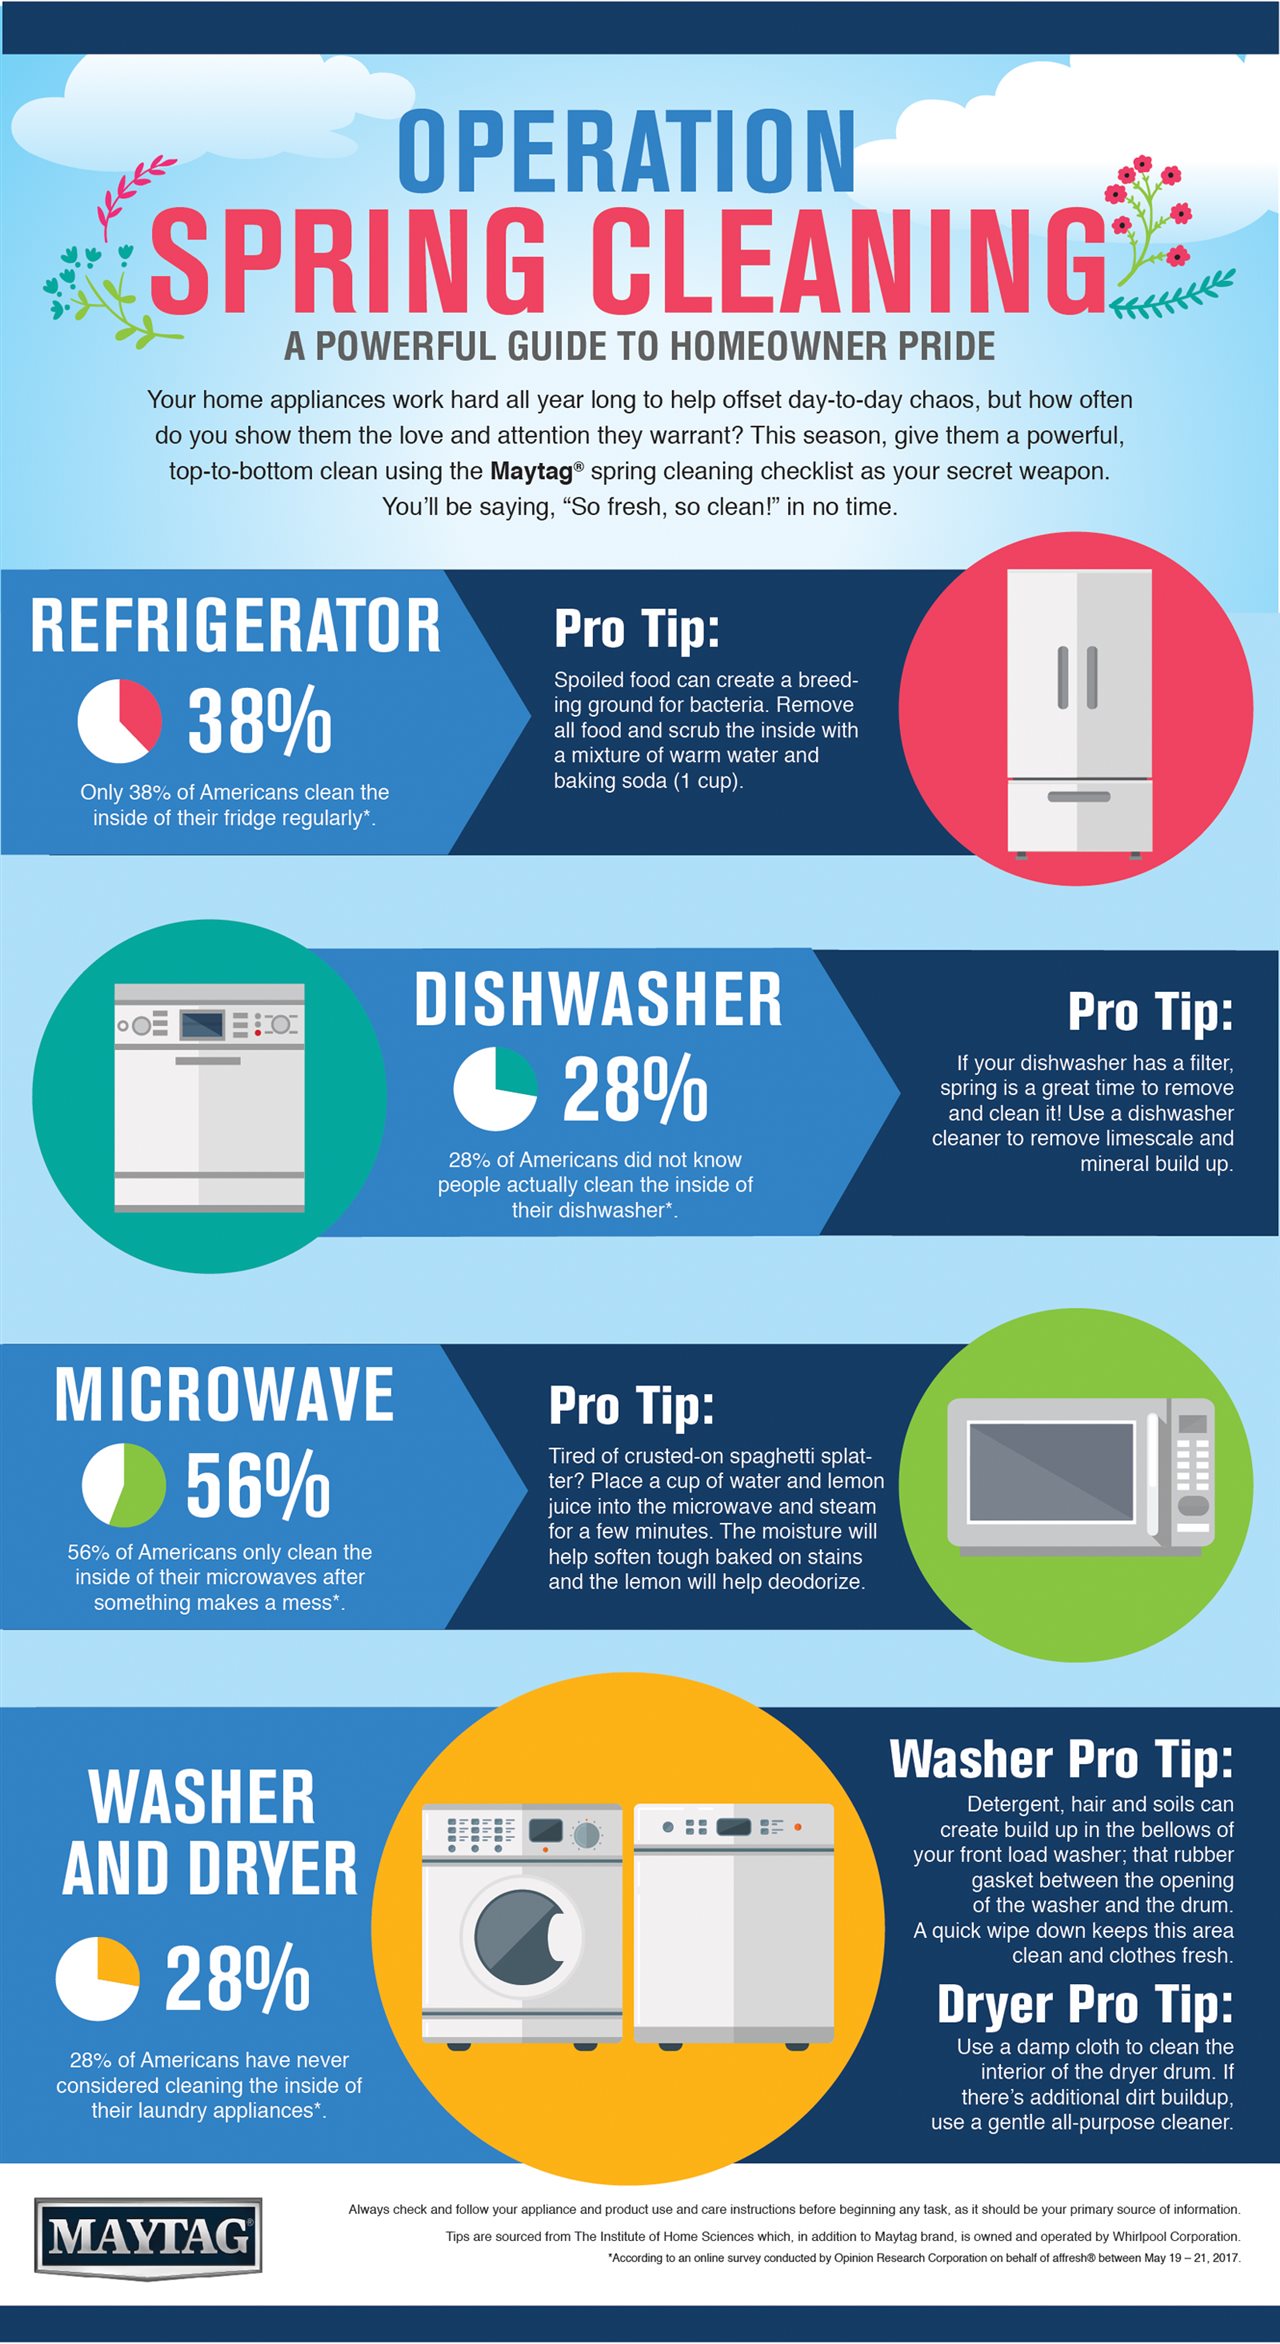
Tips to keep your pet healthy in the heat

2018-05-04T08:01:00

(BPT) – Spring is here, summer is approaching fast and it’s time to get outside and start taking advantage of the warmer weather. Dr. Jeff Werber, Emmy award-winning celebrity veterinarian, has a few tips and tricks on how to keep your pet happy and healthy in the heat.

Before you start your jogging treks, hiking excursions or bicycle touring with your furry partner by your side, it’s important to understand these spring/summer safety measures to keep your pet happy and safe.

Easing into exercise

After sitting around all winter, it is not a good idea to jump right into a full exercise regimen full speed ahead. The best approach to get your pet ready for more activities outside is a gradual introduction into exercise. A game of fetch is a perfect way to get your pet up and moving. The Chuckit! Launcher and Locator Sound Ball provides an easy way for your pet to increase their stamina, with the added entertainment of retrieving a ball that emits an audible pulse sound every few seconds to help pet parents and dogs locate the ball in any terrain after launch.

If your pet enjoys chasing ground pursuits (think rabbits and squirrels), the Chuckit! RingChaser is a great option to satisfy their instincts. Again, short bursts of chasing and retrieving are a fun way to get your pup back into shape.

It’s also critical to choose the best time of day to exercise — and noon is not it. The best time to enjoy your pet’s company is early in the morning or early in the evening. Keep in mind that in the evening after the sun is down, the pavement can still be pretty warm, as it retains heat for quite a while. Where possible, try to exercise on a grassy or dirt surface to avoid burning or irritating their paws.

Keeping cool and staying hydrated

What we love so much about our dogs is how loyal they are and how much they want to please us. This can be a problem when it comes to potential overexertion, as they will keep going just to be with us, even though they may be overheating. Moreover, many dogs and cats can overheat from lying around the house or backyard as well. When leaving pets outside during the spring or summer, make sure that shade and fresh water are always available. There are many devices available that can provide water automatically or on-demand, like the Petmate Replendish Waterer, which provides a constant flow of fresh water throughout the day for pets even when the pet parent isn’t home. If you’re out and about with your pet, consider the Replendish To-Go Water bottle that conveniently includes a travel bowl for your pet. For longer excursions, or for hotter climates, wet a bandana and place it in the freezer the night before so it will remain nice and cool a little longer. Also, make regular stops in a shady area to allow both of you to catch your breath.

Indoor dogs and cats also need to escape from the heat. Make sure the house isn’t kept too warm. Keep at least one room cooler by leaving the shades or drapes closed. Enough has been written about pets and parked cars, so I’m sure you are all aware of that potential deadly hazard. Don’t do it, not even in the shade or “only for a few minutes.” Enough said.

Limitless possibilities, while on a leash

You and your pet are finally enjoying the great outdoors, and the fun activities with Fido are endless. Our pet nation has a huge population, and it’s important to be a good citizen. Remember to respect other pets’ “space” and boundaries, and don’t assume every dog is dying to play with yours. Wherever you and your pet decide to roam, be mindful of the local leash laws. You don’t want to turn a fun outing into an emergency room visit for you or anyone else.

If you’re heading off to a park or hiking area, make sure you have everything you need for your trek. Travel treats and water bottles are always a good idea to keep with you, to make sure you and your pet are well fueled and hydrated. Keep essentials, like your keys, lip balm, waste bag, etc., all in one place with the Petmate Zipp Leash that features an expandable pouch built right into the leash to hold all dog-walking basics while on the go.

Regardless of whether you choose to run, romp, hike or trek, spring and summer are great times of year to bond with your pets. I encourage all of you to get outdoors, enjoy the warmth and sunshine, and to include your four-legged kids in your activities. Just remember to play it smart and keep them safe.


Changing addresses? 10 tips for busy baby boomers

2018-05-01T09:01:01

(BPT) – For many Americans, moving households represents a fresh start and a chance to improve quality of life. Last year, some 39.4 million Americans changed residences, thanks in part to better affordability in the housing market.

That doesn’t mean, however, that everyone’s moving process was friction-free. The logistical coordination and the physical work involved with DIY packing and loading can be a major chore in the best of circumstances. And that’s doubly true for baby boomers who are downsizing or moving to new communities, yet challenged by the physically grueling aspects of a DIY move.

Fortunately, forming a plan that troubleshoots the most common challenges can help enormously. Consider how these tips could keep your next move smooth and free of unnecessary stress.

1. Protect your treasures: Avoid the heartbreak of damaged belongings by stocking up on bubble wrap and other efficient packing materials. You also could optimize household items such as towels, blankets and coats.

2. Stagger your packing: Pack too early and you may need items you’ve stashed away; pack too late and you may be crunched for time. Start with non-essentials and out-of-season belongings a few weeks before moving day, sorting discards as you go. Save necessities for the last 48 hours.

3. Label, label, label: This may seem unnecessary while you’re packing, but will save you time and frustration upon arrival when you’re desperately looking for your essentials. It also allows you to immediately sort boxes by room and store items that are infrequently needed.

4. Secure transportation early: Instead of procrastinating and missing out on the truck you need, hop on your smartphone at least two weeks ahead to easily reserve a vehicle at PenskeTruckRental.com.

5. Right-size your truck: Rather than guessing what size moving vehicle you’ll need, plan on about 150 cubic feet of truck space for each fully furnished room in your home. That means a move from an apartment might necessitate a 12-foot truck offering 450 cubic feet, while a move from a house might require a 26-foot truck offering 1,400 feet.

6. Recruit help: The packing and transporting may sound easy until you try to do it all yourself. This is the time to call in favors or perhaps pay some teens to help with the lifting and hauling.

7. Pack your truck strategically: Optimize your space by positioning your furniture and other large, heavy items in the back of your vehicle before proceeding with lighter items. That optimizes the vehicle’s power and allows you to fit smaller items into smaller spaces.

8. Follow ergonomics: The last thing you need is to injure your back through haphazard movement during the loading process. Stretch beforehand, avoid twisting your torso as you load and remember to lift with your legs by crouching rather than bending from the waist.

9. Strategize your route: Map out the way ahead of time, review weather forecasts, avoid rush hour and leave yourself plenty of time for breaks, refueling and unloading.

10. Drive like a pro: Many people are unfamiliar with the difference between driving a car and a big truck. Read all instructions provided and understand how to drive differently to remain safe (and legal).

Regardless of your age, a DIY moving process can be efficient and pain-free when you organize the details ahead of time. Talk to Penske Truck Rental for more suggestions on making that happen.


5 questions to ask when shopping for a mortgage

2018-04-26T12:01:00

(BPT) – Buying a home is a major financial commitment. It’s exciting, but can also be confusing and overwhelming. Choosing the best mortgage that fits your needs is an important first step and first-time homebuyers in particular should research the many options and know the right questions to ask. Here are some questions to ask a lender that will help you make an informed mortgage decision:

* How much can I afford? A home affordability calculator can help you get an idea of what you may be able to afford and keep your monthly payments within your budget. In addition to recurring expenses like car payments, student loans, credit cards and disposable income, be sure to consider other monthly expenses related to the new home, like association fees, homeowners’ insurance, utilities and property taxes. Further, some types of mortgages have firm eligibility cutoffs related to the ratio between a buyer’s total debt amounts and their monthly income.

* How much do I need for a down payment? It’s a common misconception that a 20 percent down payment is required to buy a home. Let’s face it, a 20 percent down payment is a lot of money, and often the largest obstacle for homeownership, especially for first-time buyers. You can qualify for a conventional mortgage with as little as 3 percent down. Conventional mortgages originated with a low down payment, which is defined as less than 20 percent, require private mortgage insurance (MI) until approximately 20 percent equity is established through either monthly payments or home price appreciation. When mortgage insurance cancels, your monthly mortgage bill is reduced. It is important to know that not all forms of MI are created equal — private mortgage insurance is temporary and cancelable but the overwhelming majority of mortgages backed by the government’s Federal Housing Administration (FHA) contain insurance that cannot be canceled.

* What is the interest rate and is it fixed? Most first-time homebuyers go with a 30-year fixed-rate mortgage, which locks you into an interest rate with steady, predictable payments. Different lenders may offer different rates, so make sure to contact several lenders to ensure you’re getting the best option available in the market. A rate lock protects you from rising interest rates while the loan is being processed and lasts for a specific amount of time. In addition, make sure you know whether the rate is fixed or “adjustable.” Adjustable rate mortgages, commonly referred to as “ARMs,” result in periodic adjustments in the interest rate based on the lender’s cost of credit, and can be detrimental to homeowners in rising interest rate environments. Finally, ask if you are paying for “points” to reduce the interest rate. It’s an added upfront cost paid at closing, but it results in a lower rate for the life of the loan.

* Does my credit score matter? Yes, generally stronger credit scores (FICO 720 and above) come with better interest rates, but fortunately there are mortgage options for those with imperfect credit scores too. When you apply for a mortgage, your credit record is used to help determine your approval and mortgage terms, but it is not the only thing lenders consider. A lender will also look at your debt-to-income (DTI) ratio, cash reserves and other factors to help gauge your overall creditworthiness.

* Should I get pre-approved for a mortgage? Yes. Pre-approval means you receive a conditional commitment from a lender up to a specific loan amount. In a seller’s market with tight housing supply, being pre-approved demonstrates that you are a serious buyer with access to mortgage financing. To become pre-approved, you’ll provide your lender with information on your income, assets, debts and credit history to analyze your financial profile and determine your creditworthiness and amount you can borrow to purchase a home.

Make sure to know your options and choose the one that works for you. Check out lowdownpaymentfacts.org to learn more.


Grow your own flowers and vegetables this summer with this easy DIY garden bed project

2018-04-26T10:01:00

(BPT) – When it comes to DIY, some projects are about function, others about flair. And then there are those projects that do it all, like the perfect raised garden bed. Whether you want to get back to nature or add a signature piece to your outdoor space, this project delivers. Plus, it’s easy to do yourself, saving you time and money so you can focus on enjoying the season.

Adding this attention grabber to your outdoor space is easier than you think. Use these instructions to build a 4-foot-by-4-foot-by-2-foot bed and get ready for the planting season. Remember, the directions can be altered to a size that better fits your garden.

1. Assemble your materials

The right tools make any job so much easier, so before you start your project make sure you have everything you need. For this project you will need a T50 Heavy Duty Staple Gun, a PT18G Pneumatic Brad Nailer, Arrow T50 Staples and some Arrow Brad Nails. You’ll also need a few other pieces you can find here.

2. Building the base

Place the square on a corner of your work table. Set two corner posts on the table with one on the square. Next, place four bed sides on top of the two corner posts and align them with the edge of the square. Use the Arrow PT18G Pneumatic Brad Nailer and 2-inch Arrow Brad Nails to secure the bed sides to the corner posts. Repeat the process one more time.

3. Secure the sides

Now place one assembled side upright on the table. Secure the next four bed sides, one by one, starting at the bottom with brad nails. Repeat on the opposite side of the assembled piece with four more bed sides. Take the remaining assembled side and secure it with brad nails to complete the four sides of the garden bed.

4. Applying the mesh

Place the garden bed on its side. Use the Arrow T50 Staple Gun and Arrow T50 504M1 1/4-inch staples to attach the 5-foot-by-5-foot mesh to the bottom of the bed. This mesh will allow earthworms to get in and help keep the weeds out. Use scissors to trim the excess mesh. The 504M1 staples are rustproof and rated for outdoor use.

5. Finishing the bed walls

Next, staple the plastic to the inside of the bed walls. Raised garden beds last a little longer with this plastic in place.

6. Fortify the fence frames

Now build the fence frames with the Arrow PT18G Pneumatic Brad Nailer and 2-inch Arrow Brad Nails. Use the clamps and the square in this step as pictured. When built, there should be two frames measuring 10 inches by 48 inches and two frames measuring 10 inches by 49 1/2 inches.

7. Add larger mesh sections

Next, attach a 12-inch-by-50-inch piece of mesh to one side of the frame with staples. Repeat this step three more times and trim any excess mesh with scissors.

8. Hook up the hinges

Place the raised garden bed on a table and measure each side of the bed at 12 inches for hinge placement. Secure the hinge with a drill, continuing on all four sides of the garden bed.

9. Finishing the frame

Set a smaller fence frame on the top of the garden bed and attach it to the hinge. Repeat this process on the opposite side of the garden bed as well. Take the longer fence frame and attach it to the hinge, continuing on the opposite side.

10. Linear latches

Line up the latches as pictured, attaching them with a drill, two on each side of the garden bed. These latches will allow you easy access to your plants.

11. Enjoy your new garden bed

The garden bed is now ready to use. Fill with soil and plant your favorite flowers or vegetables.


Rooftop decks for every style

2018-04-25T14:01:00

(BPT) – Fresh air, great views and capitalizing on unused space — it’s no wonder rooftop decks are a hot trend for suburban homes and urban apartment complexes alike.

Once reserved for the urban elite, rooftop decks are popping up all over the country as an attractive option that offers a mixture of space savings and an unrivaled view. The magic of rooftop decks is they take advantage of what was formerly unused space — the top of a building or the flat roof over part of a home — and reclaim it for a unique entertaining area or a family gathering spot.

“Especially when we’re working in cities, rooftop decks are essentially reclaiming space for a family that probably wouldn’t have any outdoor space otherwise,” said James Muckinhaupt, a senior builder/project manager for Mosaic Outdoor Living, a high-end custom deck builder in Colorado.

All that newfound space can present a challenge to designers and the homeowners they serve as they try to define the space to make the most of the rooftop deck’s open layout.

“If designers don’t really delineate the space well, we’ve found the decks end up being a giant space that’s never fully utilized by the homeowner,” James said.

James and his wife, Mary, a custom furniture consultant, offer some advice on how to turn your rooftop deck into a personal oasis and get the most out of the space.

1. Define the use

Mary said defining how the deck will be used the majority of the time is the top way to make sure the space fits the homeowners’ needs. Questions like, “Will the deck host weekly family dinner?” and “Will you use it daily for drinks and lounging?” help determine whether a kitchen/dining area is needed and how much seating should be included.

“It’s also important to know the average number of people they expect to fit on the deck,” Mary said. “If we don’t furnish and set the deck up so it’s conducive to their needs, we’ve found that people don’t use the deck.”

2. Stay true to your style

Most people have a style or color scheme they are already drawn to. A good designer will pay attention to the rest of a homeowner’s space and incorporate that theme into the rooftop deck to create a cohesive style from interior to exterior.

3. Focus on materials

Materials have a huge impact on the final look of the deck, whether it’s sleek tile, decorative concrete or luxury composite lumber. James said his rooftop decks are primarily Envision(R) composite lumber by TAMKO, because of the wide variety of styles the boards can accommodate, taking on everything from the look of exotic hardwoods to distressed reclaimed barn wood.

4. Add a covering

Regardless of how the deck will be used, it’s nice to have a covered area to escape the heat of the sun or the rain. Depending on the homeowners’ needs and budget, the covering can be anything from a grouping of large umbrellas to a covered structure with glass walls.

5. Include a fire element

If adding a covering helps extend deck season through the extreme heat of summer and the rain of spring, including a fire element extends the deck’s use through the fall and winter. This could be something as simple as a fire pit or as elaborate as a built-in fireplace.

“Between a shade covering and a fireplace, you’re extending deck season to 70-80 percent of the year, depending on where you live,” James said.

6. Work with the views

In the process of deciding where to add a covering and how to position furniture on a rooftop deck, consider the natural views. One area of the deck may offer superior views, either of nature or of a cityscape. Position furniture to open up to the best view and construct deck coverings and any needed walls, to obstruct any undesirable views.

“The view is one of the best things about a rooftop deck, so we want to focus the seating around whatever is the best view,” Mary said. “If there are great views on multiple sides, we’ll recommend using swivel chairs to give people the best of both.”


How your lawn equipment is harming the environment

2018-04-25T14:01:00

(BPT) – Spring is upon us and our yards are beginning to bloom. The grass needs to be cut, the hedges trimmed and the debris blown away. This is an exciting time of year as we all look forward to getting outdoors after a longer than desired winter season.

As we begin our list of warm-weather chores, is it possible that our lawn equipment is actually harming the environment? Unfortunately, the answer could be yes, depending on the type of equipment you’re using to keep your lawn in tip-top shape. If you’re still using gas-powered outdoor gear, here are some important facts that you should know, according to Ted Steinberg’s American Green:

* A gas-powered walk-behind mower running for one hour emits as much pollution as eight cars operating for the same period of time.

* A riding lawn mower emits as much pollution as 34 cars operating for the same period of time.

* In the U.S. alone, 17 million gallons of fuel are spilled into the ground every year during the refueling of lawn and garden equipment.

Now that you know some of these shocking statistics, what can you do to make a difference?

Fortunately, thanks to advancements in technology, there are now viable alternatives to gas-powered lawn equipment. Battery-powered outdoor gear delivers the same power and run-time of equivalent gas equipment, and battery-powered options completely eliminate harmful emissions. Importantly, battery-powered gear doesn’t require the mixing and pouring of gasoline, and is quieter, lighter and easier to use than gas models.

The good news is that people are making the change from gas to battery-powered equipment. For the first time in 2017, more battery-powered leaf blowers were sold than gas models, according to TraQline. Hopefully, with your help, that trend will continue to grow across all product categories in the future. For more information on battery-powered tools and how you can make a difference when working on your lawn, visit greenworkstools.com.


How to get a more sustainable yard this spring with battery-powered products

2018-04-23T10:09:00

(BPT) – Years ago, lawn care could hardly be considered an eco-friendly business, but today’s market has changed thanks to new technologies and emission regulations. The result leaves homeowners with the best of both worlds — the ability to create the perfect outdoor space by using tools that are powerful yet eco-friendly and creating low noise, so your neighbors will like you, too.

Here are some simple steps you can take to reduce your carbon footprint while maintaining a yard that will leave your neighbors jealous.

Staying ahead of the curve

While a sustainable lifestyle is a personal choice in many ways, when it comes to your lawn care equipment, investing in such options places you at the forefront of a growing battery revolution that has been sweeping the country.

The foundations of these technological and economical changes date back to 2011, when the Environmental Protection Agency overhauled emissions regulations for lawn care equipment. Since then a steady timeline of new carbon emission regulations has been introduced to further reduce gas equipment emissions and further shift the market toward environmentally friendly, battery-powered lawn care solutions.

While all states are handling these changes in their own ways, California remains at the forefront of the battery-powered movement. The state is reviewing its emission standards policies and plans are in place for a full emissions regulation overhaul to take effect in 2020, further pushing homeowners toward more sustainable lawn care options.

Are you on trend?

In the face of pending change, many homeowners are staying ahead of the curve and already switching to more sustainable, battery-powered tools. A recent survey from Husqvarna showed 48 percent of people say they now mainly use battery-powered outdoor tools today. In addition, 78 percent of respondents said they can see their next lawn care tool purchase being battery-powered.

Supporting the battery revolution, Husqvarna continues to offer a full line of battery-powered lawn care tools, including mowers, leaf blowers and trimmers, along with their robotic lawnmower — the Husqvarna Automower. Each product within Husqvarna’s battery-powered lineup not only eliminates emission concerns, but provides a lighter weight for increased user comfort as well as an overall much quieter solution all without a decrease in performance. An additional benefit is that battery-powered equipment is ready to go by the push of a button and doesn’t need the same level of maintenance gas-powered products do.

The Husqvarna Automower, for example, is a fully automated lawn care experience. It allows homeowners to set the boundaries in their lawn for the Automower while they sit back and the Automower cuts and fertilizes the lawn with the small grass clippings. It gives homeowners more time to do the things they enjoy while providing a better, healthier lawn.

In addition, Automower’s associated app — called Automower Connect — allows you to check the status of your lawn maintenance and control your mower from anywhere, all while enjoying a perfect and eco-friendly cut. Taking it a step even further, Automower will work with Amazon’s smart assistant, Alexa, starting later this year. Smart home? How about smart home AND smart lawn?

Move forward with your own sustainability plans

Living a sustainable lifestyle and having a more sustainable yard no longer need to be mutually exclusive. In fact, with the latest technologies, it is perfectly possible for one to complement the other. So, visit Husqvarna.com to learn more about your battery-powered equipment options. You, your lawn and the environment will all be better for it.


6 ways to revive your home with essential oils

2018-04-23T09:17:00

(BPT) – Essential oils, highly concentrated essences of plants, have the power to improve our lives, revive our spaces and boost our mood, whether it’s through diffusing them to add a fresh scent to the kitchen, creating a spa-like oasis in your bathroom or whipping up DIY cleaning products to use all over your home.

“How we care for the everyday spaces we live in impacts our well being,” said Charlynn Avery, an aromatherapist and educator for Aura Cacia, a company that sources and sells essential oils. “It’s all about the power of positive change. Clean, synthetic-free living is good for everyone, and using essential oils in your home is one way to do that.”

Even better news? It’s easy to use essential oils to refresh and revive your living space. Here are some ideas to get you started:

Freshen up your fridge. Most everyone has a box of baking soda tucked on a shelf in their fridge to absorb odors from last week’s leftovers or that questionable carton of milk. Why not make the box do double duty by adding essential oils? Grapefruit, lime, bergamot or lemongrass will give your fridge a fresh scent. Hint: Sprinkle a little of the baking soda mixed with essential oils into your garbage can to freshen it, too.

Brighten your DIY cleaning products. Ditch the chemicals lurking in store-bought cleaning supplies and make your own, infused with intoxicating scents! Once you try it, you’ll never go back to commercial cleaners. And it’s easier than you might think.

Here’s just one recipe: For window cleaner, combine 1 1/2 cups distilled water, 2 tablespoons white vinegar and 1/2 teaspoon of Aura Cacia Main Squeeze Essential Oil Blend in a 16-ounce spray bottle. Shake well, and voila! You’re ready to tackle your windows. You’ll find more easy recipes for making your own, natural cleaning products at www.auracacia.com.

Banish food odors. Is the smell of the bacon you fried for breakfast still lingering in the kitchen at dinner? Pop a pan of warm water on the stove and add essential oils like cinnamon or citrus and simmer. It’s a quick, low-cost way to diffuse oils for instant aromatherapy while getting rid of lingering cooking odors.

Make the most of your open house. Realtors will tell you that bad smells make a bad impression, and good smells make a positive impression. It’s important to clean your home from top to bottom to neutralize pet odors, your teen’s room full of gym clothes and other sources of bad smells.

Essential oils don’t just cover up odors, they can enhance your mood. Try citrus oils like lime in a room spray, grapefruit in a diffuser or sweet orange simmering on the stove to promote positive feelings in potential buyers.

Becalm your bathrooms. Set a diffuser on the counter and add lemon, grapefruit or orange for a fresh scent, or try lavender, eucalyptus or tea tree to create a garden-like oasis.

Revitalize your carpets. Pets, kids and general foot traffic can do a number on the way your carpets smell, and that odor can permeate the whole room. Add the essential oil of your choice, like bergamot, to a box of new baking soda. Sprinkle it on your carpet, let it sit for 15 minutes or so and vacuum it up. Hint: Pop a cotton ball doused with essential oil into your vacuum bag or filter to spread fresh scent every time you vacuum.

For more information about essential oils, including recipes for DIY products and more ways to use them, visit Aura Cacia.


4 ways to simplify your DIY projects and home improvements

2018-04-19T09:01:00

(BPT) – Whether you’re working on a spring home improvement project or a summer task, this is the time of year when you focus on improving your home both inside and out. As you look for ways to make your home even better, nothing beats a good DIY project.

DIY home improvement projects are popular each year, and they can be as big or small, short or long and expensive or inexpensive as you desire. Whether you are an advanced builder or a novice home improver, the options are wide open, but remember the one thing every DIYer can agree on: Eliminating unnecessary difficulties and the chance of having to redo a task is always a plus.

A recent Post-it Brand study conducted by Wakefield Research found nearly 40 percent of workers have to redo a project or task at least once a week specifically because of poor communication. Even professionals run into hurdles along the way, but avoid situations such as this with a few easy tips.

To make your next DIY project go as smoothly as possible, here are four ways you can iron out potential difficulties before they become a problem. After all, a smooth project isn’t just more fun and rewarding, it saves you time.

* Capitalize on subject matter expertise. A little experience goes a long way, and you’ll understandably have an easier time tackling a DIY project you’ve done before. In many cases, however, this isn’t possible, so look to your friends and family to see if any of them have ever completed a similar project. Ask them your questions and learn from their experiences and you’ll gain valuable insight about what to do — and what not to do — before your project even gets started.

* Keep accurate, durable notes. Throughout the course of your project, you’ll take notes regarding processes, punch lists, measurements and the materials you need. However, even a slight miscommunication or lost note can compromise the project, even for a professional. Post-it Extreme Notes are an innovative new product designed to facilitate communication and ensure important notes stick securely, whether on a job site in construction, manufacturing or foodservice or at home in a freezer, garage, boiler room or bathroom. They stick to textured, rough and curved surfaces, including those involved in home improvement projects such as raw wood, brick exteriors, tile bathrooms, cement garages and more. Made with ultra-strong Dura-Hold Paper and Adhesive, Post-it Extreme Notes withstand harsh conditions indoors and outdoors, like moisture, wind and extreme temperatures. These durable, water-resistant notes help keep track of important information to get the job done no matter what the task is.

* Explore your options to find the right tool for the job. How many times have you tried to tackle a DIY project with the wrong tools simply because you didn’t want to spend the money on the right tool for a one-time use? If this has ever happened to you, consider renting the items you need instead of buying them. Tools like paint sprayers, jackhammers and brush cutters can all be rented for a fraction of the price you would pay to buy them, and doing so ensures you have the right tool for the job from the very beginning, allowing your project to go more smoothly.

* Plan out as much as you can. The adage of measure twice, cut once still holds true for today’s DIY projects, and your possibilities to “measure twice” are magnified thanks to modern technology. If you’re planning to paint a room, for example, many paint companies offer a simulator where you can see how the paint will look in a digital environment. There are also other virtual tools to help you get accurate measurements, test layouts and reduce mistakes in your DIY projects. Once you’ve found the answers you need, record them on a durable note like Post-it Extreme Notes and write down measurements, jot down step-by-step directions and map out furniture and paint placement throughout the process.

Start planning your project today

Big or small, your project is as unique as you — but it won’t be completed until you start. Apply the tips above and your project will be done before you know it.

Data statistics about communication are results from a Post-it Brand survey conducted by Wakefield Research (www.wakefieldresearch.com) among 1,000 U.S. workers, ages 18+, who work in non-office settings, with statistically significant data among the following industries: trades/construction, manufacturing and culinary, using an email invitation and an online survey.